My geek seems to be showing this week in my titles. That's ok, I have geek pride.
I'm really excited to show these nails this week. I finished them off this afternoon, got the pictures taken, edited and watermarked and now it's time to get down to business!
Showing posts with label Manicure. Show all posts
Showing posts with label Manicure. Show all posts
Friday, February 15, 2013
Monday, August 20, 2012
Freshening Up
One of the things I like the most about UV Gel polish is the fact you can wear regular polish over it. Three weeks is a long time to wear the same look. If you're anything like me, you need to change it up a little bit, at the very least from week to week.
One of my favorite ways to freshen up a UV Gel polish mani that feels "old" or boring is to use regular polish for nail art OVER your base color. I did just that to freshen up my wedding mani! Here it is on my wedding day.


One of my favorite ways to freshen up a UV Gel polish mani that feels "old" or boring is to use regular polish for nail art OVER your base color. I did just that to freshen up my wedding mani! Here it is on my wedding day.

Here it after a quick stamp with little glitter dot flower centers added.

One of the most common things I see in my business is young ladies who cannot wear nail art during the week because of job restrictions. However, they come see me Friday afternoon - and I'll add nail art using regular polish for the weekend which they then remove using regular polish remover before going back to work on Monday morning.
Freshening up your mani doesn't always have to be done to hide wear and tear! Have some fun with it!!
Sunday, August 12, 2012
Post Wedding Check-in
Well, I have made it through all the insanity and I think I managed to not loose my mind. lol We are now moved into our new place (though not completely) and we had a lovely wedding, and we're enjoying our "family honeymoon" this weekend. I'll be back to posting regularly, but initially, I will no longer be making daily posts. I will, however be posting at least once a week while I try to get our daily lives back to normal and get the lil one set up for the new school year.
Without further ado - I bring you a wedding photo! For the moment, it's the only one I have access to but I promise to post at least one more of the entire dress.


Without further ado - I bring you a wedding photo! For the moment, it's the only one I have access to but I promise to post at least one more of the entire dress.

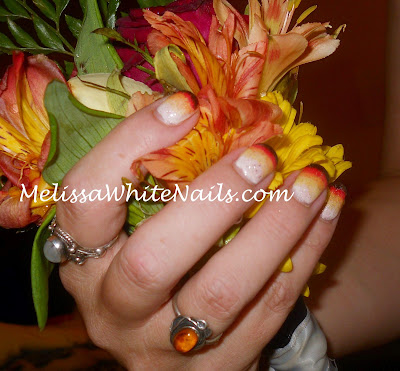
Of course, since this is a nail blog - this entry would not be complete without a photo of my manicure for the day!! I did my nails with Gelish and I took this picture almost a week later so there is some growth going on there. I still love the look!


The flowers are from my daughter's bouquet. She was one of my bridesmaids and I had to get the nails with the flowers becauses I did like my wedding flowers. I wonder how much of that is because I did my own flowers? haha!
That's all for this week - I'll see you all next Sunday! Have a nailicious week!
Sunday, May 6, 2012
Blue Ombre Gradient
Good Morning fellow nail art fans! I'm back to my obsession with blue and this time I'm really diving in to the color! I have blue ombre gradients that go from light blue to an indigo blue! Of course, I included glitter and shimmer galore because I can't help myself.

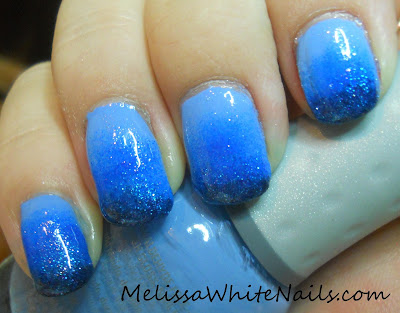

This is another one I tried the other night but changed it just a little bit because deep down I was unhappy with the original concept. I originally had the colors going from white to blue to dark blue to indigo and I think that was just too many colors and my nails aren't long enough to give a proper graduation to the color.

I genuinely love love love this gradient and I have a few sundresses this would go fabulous with come summer time!! I hope you enjoyed today's post and Thanks for reading!!
Friday, May 4, 2012
Blue Foil French
Good Morning and Happy Friday. No #FishEggMani today, I'm still a lot burned out on it after wearing it for five whole days. Instead, I'm bringing you a twist on the french mani that I did last night but the pictures didn't come out. It turns out that it's just as well they didn't. I came up with some tweaks to the original thought I had by alternating the colors.

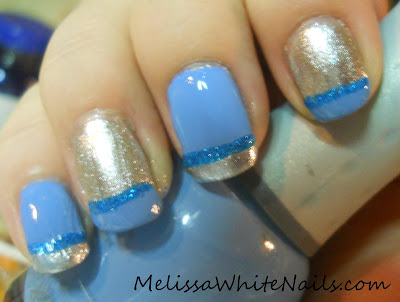

I'm still in love with Orly's "Snowcone" and I was dying to try it as a french. Originally, my thought had been to just do the blue with the foil at the end, separated by the blue glitter stripe. Tonight I had the thought that it would be so much cooler to alternate the foil and the blue.

I'm definitely pleased with how much better these came out than my original design. I've long been a fan of adding color to the old fashioned "french" and dressing it up a bit. Apparently that's really trending these days and that makes me a little giddy to know I've been way ahead of this trend.
I hope you enjoyed today's fun twist on an old favorite and thank you for reading!
Saturday, April 28, 2012
Gel-ly Sandwiches
Good Morning and a wonderful Saturday to you! I'm soo excited about today's Nail Art. After removing my Emeral Fish Egg Mani, I also removed all my Gelish polish. Time for a new Gelish Manicure! After seeing the many "jelly" themed tweets and blog posts by Jeanette at the swatcholic I was completely inspired to see how a "Gelly" sandwich would look using my Gelish.
For those that are not familiar with the term "jelly sandwich" it's a layering technique involving using "jelly finish" polishes with a layer of glitter in between. Now Gelish doesn't have a "jelly finish", however, it does have shades that are sheer which would work like a 'jelly', and some very nice glitters. You'll have to pardon the low lighting here - using flash and bright light, you just couldn't see any of the glitter or the effects that it actually has.


For those that are not familiar with the term "jelly sandwich" it's a layering technique involving using "jelly finish" polishes with a layer of glitter in between. Now Gelish doesn't have a "jelly finish", however, it does have shades that are sheer which would work like a 'jelly', and some very nice glitters. You'll have to pardon the low lighting here - using flash and bright light, you just couldn't see any of the glitter or the effects that it actually has.

For this one I used my old favorite "Taffeta" and layered it over "June Bride". The silky finish of "Taffeta" over the glittery goodness is just stunning!! I love love love this!! So I'm going to show you another photo.

If you want to get a really close look - just click the pictures and you can see how great this effect is.

Then I decided to go ahead and stamp over it a tiger pattern using a berry polish and the glitter shows through that too which is just as amazing.

You can clearly see one of the larger pieces of holo glitter shining through the stripes on my middle finger and it's just amazing. I love this look and I think I'll be sporting it more often!
I hope you enjoyed today's Gelishicious Gelly Sandwich and thanks for reading!!
Friday, April 27, 2012
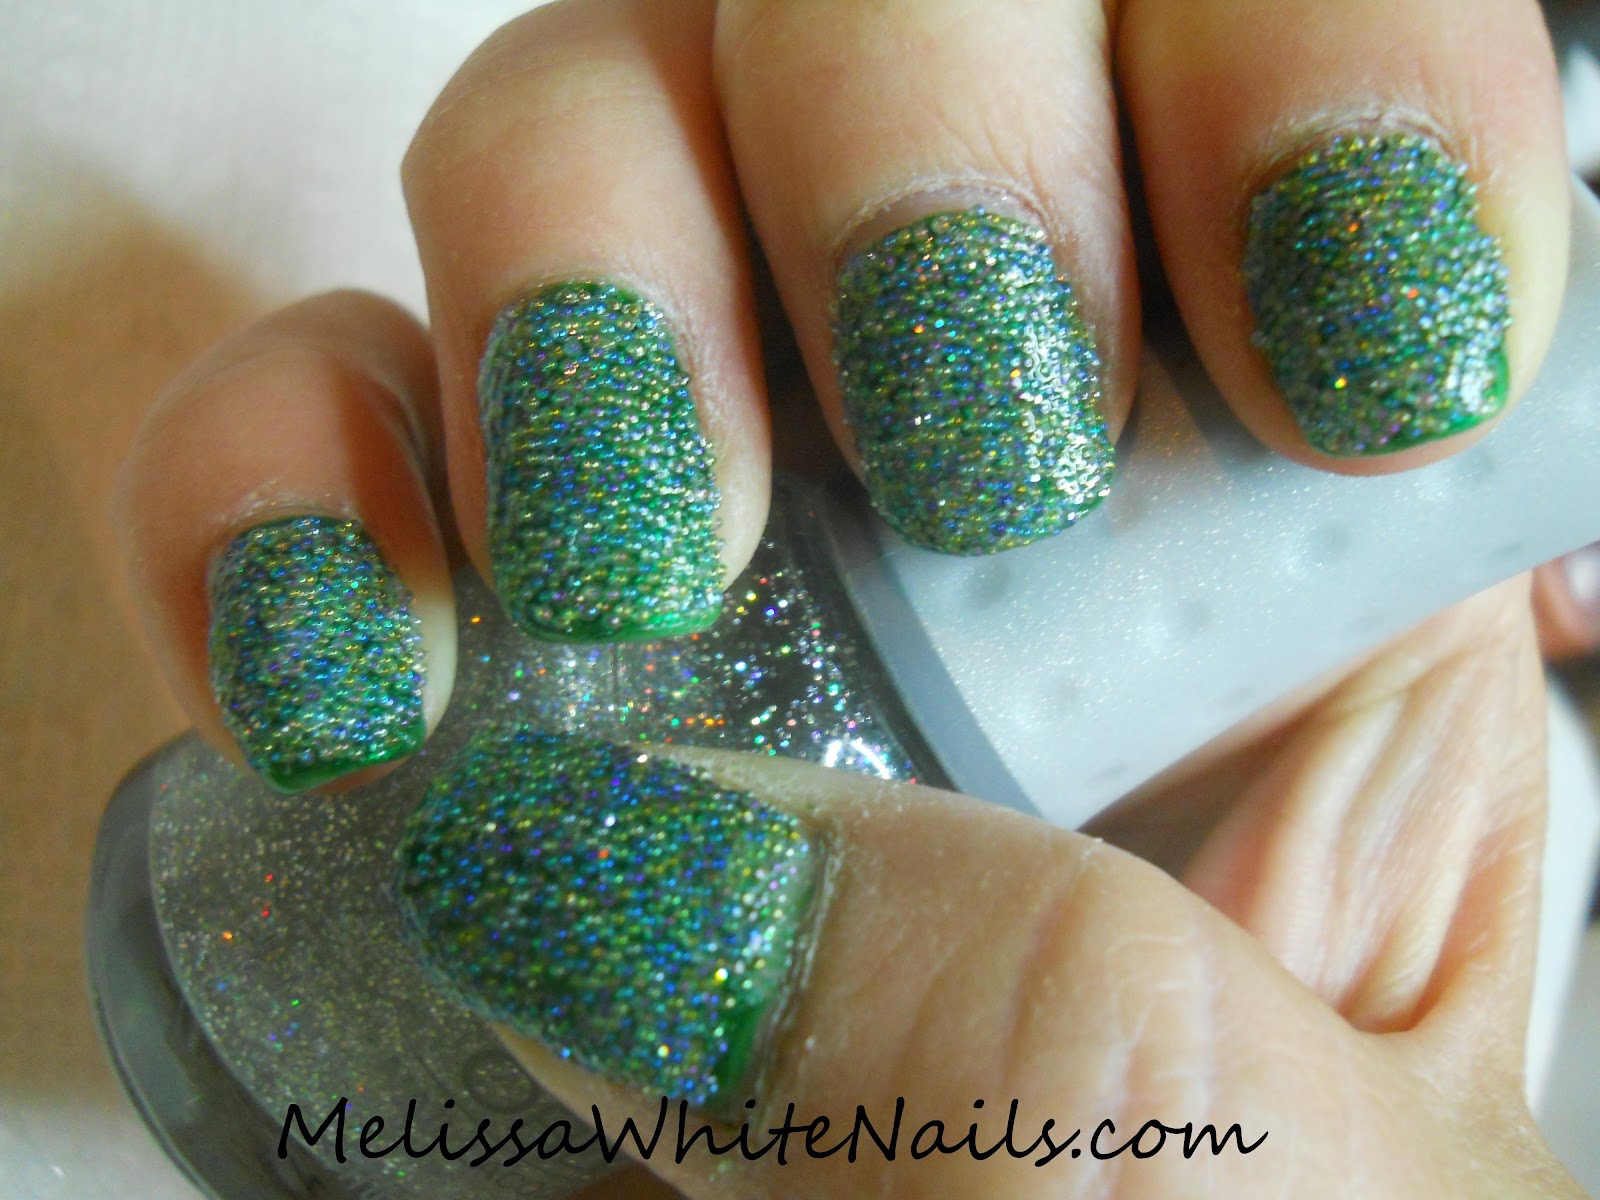
Emerald City Caviar
Good Morning and Happy Friday!! The weekend is finally here!! It has been a tough week for me as myself and the little one have been suffering from a lingering cold. We're finally on the mend and looking forward to getting out in the sunshine over the weekend!
I am doing another #fisheggfriday post today. I thought I'd do something just a little bit different than my normal post. Reading all the posts that have been done in the past few weeks, the single biggest complaint is how impractical it is. Beads flying off everywhere and it catching on everything. Which got me to thinking, what can I do to make the beads stick really stick?? I had a few ideas and decided I'd try them out and see how it all holds up.
Here is my nails just done with Sally Hansen's Xtreme Wear "Emerald City", on my right hand.

The same on my left. You'll notice I clearly do not take pictures very well using my right hand.

Here's my left hand after applying microbeads. I did this a little different than most of the DIY steps you see in the blogs. I let the entire mani dry and then, one nail at a time, used one thick coat of Seche Vite and sprinkled the microbeads, while it was still wet. I then pressed the beads down and trimmed as needed. I repeated the process for each finger. Once all the nails on that hand were covered in beads, I dabbed on a goat of glitter by laying the brush parallel to my nail as I dabbed rather than at a perpendicular angle when I'm brushing on polish. I let that fully dry. Finally, I lightly brushed on a coat of old thick Seche Vite to really secure the beads. Here's my right hand.

My left hand, I apologize for the poor picture quality.

You can really see on the picture of my left hand that the final coat of thick Seche Vite took away some of the texture of the beads. This was not much of a surprise. I noticed some times ago that old thick fast dry top coats can be great when applied to nail art that has texture and you would rather it not. You simply use your fresh fast dry top coat to seal in the design and when it is dry - apply the old top coat to give your nails a slick smooth appearance and texture. Sammasaurus also uses this technique. I was not unhappy with the look of this though.
By the end of the day, I hated it. The beads really did catch on everything and it just felt awkward and wrong. I seriously regretted doing this on all ten of my fingers. The blue and green colors that the clear microbeads brought out of the polish were awesome, I managed to keep the beads on my fingers and not all over the place but it was still completely unwearable like this. Here it is again, three days later.

Virtually no difference in how it looked but still not nearly as wearable as I'd hoped. I think this is a doable as an everyday look if one restricts it to just an accent nail on the ring finger, which is our least used and weakest finger.. It truly was annoying because it was on ALL my fingers.
I want to note here that I did remove it and I did NOT use acetone or any nail polish remover to remove this. I used my Gelish remover to get the beads off my fingers. I simply soaked a cotton ball with Gelish remover, laid it on my nail and wrapped the whole finger in foil. I let it soak for a full five minutes and the beads and most of the polish simply wiped off. It's also great for removing glitters the same way. I often use my Gelish remover to remove old acrylic enhancements for clients as well the Gelish polish it's designed to remove. I chose to use this product instead of Acetone because it's not nearly as rough on my nails and cuticles as Acetone is. The product is too expensive to be used simply as a polish remover - but it certainly save time and work when removing more difficult things like a nail full of microbeads that are swimming in that much topcoat or glitters and jelly sandwiches. The remover is available on Sally Beauty Supply's website. Larger sizes are available through independent distributors of Nail .Harmony products.
I hope you enjoyed reading about my experiment today and Thank You for reading! Don't forget you can follow "Fish Egg Friday" on twitter with the hashtag #fisheggfriday.
Monday, April 23, 2012
Delicate Bridal
Good Morning and Happy Monday! I'm off teaching preschool today, I was supposed to have the day off but I volunteered to cover for one of the other mom's who sprained her wrist. Poor girl has this HUGE splint on it and she really can't do anything with it. Besides, I like teaching these kids and there's not that many weeks left in the school year.
On to today's nail art. This is one I did during Valentine's but I find it still very much appropriate for the bridal season.


On to today's nail art. This is one I did during Valentine's but I find it still very much appropriate for the bridal season.

I decided to do today's pix large because this is such a delicate design, I really want you to see it properly.

The base color is a Gelish color, Taffeta with red and green polish stamped over it. A little regular nail polish remover and the bride is sporting a low-key but pretty look for the honeymoon!
That's it for today, tomorrow I will show the mani I have planned for my own wedding this summer. To say it's a bit non-traditional would be an understatement. Thank you for reading and have a Groovy day!
Sunday, April 22, 2012
Hearts and Brides
Good Morning! I hope your Sunday is going well, I apologize for the lateness of my post but I'm a bit sick. With that in mind, I'm going to really short today. Enjoy!


Here I stamped the hearts in red, then stamped over them again in white to give the design the illusion of depth.

That's all I have for today, I hope you enjoyed. Have a great day and thank you for reading!
Thursday, April 19, 2012
Who doesn't love a good matte look?
Good Morning and Happy Friday Eve!! I stayed up a little late last night doing this mani and my mani for "Fish Egg Friday". Starting tomorrow, the theme for all my nail art for the next week (if not longer) will be Bridal! What better way to start than with a caviar mani??
That all begins tomorrow, I have not forgotten today's Nail Art!! I have been dying to try a matte stamping design and I finally worked out one that I really really like!! I hope you do tooo.


That all begins tomorrow, I have not forgotten today's Nail Art!! I have been dying to try a matte stamping design and I finally worked out one that I really really like!! I hope you do tooo.

I am just sooo in love with this look!! That's "Riveting" from China Glaze's Hunger Games Collection. It's second only to "Ruby Pumps" as my favorite polish. Adding the matte top coat was really what made this look for me.

You know I took more than a few pictures of this, so I'm going to show them all.


That's all I have for you lovelies today. Don't forge that this week is bridal week and spread the word to those friends looking to get married this summer! ;)
Wednesday, April 18, 2012
Spring Cherry Blossoms
Good Morning and Happy Hump Day! I'm so very much into the spring vibe this week, even though we don't actually have "spring" this far south in Florida. We have two seasons, hot and wet; hotter and wetter. Spring and Fall are just hotter and wet. All that being said, I still like the idea of spring - it just makes my creative juices flow!
Today I did some Cherry Blossoms. I've never done these before but it is simple and straightforward and the effect is just sooo pretty. I started out using Orly's "Snow Cone" from the Sweet Collection, and I think this one may be discontinued but it's such a pretty light blue.


Today I did some Cherry Blossoms. I've never done these before but it is simple and straightforward and the effect is just sooo pretty. I started out using Orly's "Snow Cone" from the Sweet Collection, and I think this one may be discontinued but it's such a pretty light blue.

I added the flowers and the branches using acrylic paint.

That's about it for today's nail art. I hope you enjoyed it because I know I certainly enjoyed doing it. It's all cheery without being loud!
Monday, April 16, 2012
Spring Green
Happy Monday!! I hope everyone enjoyed their weekend. I certainly did! I changed my gelish last night and it was completely weird! Usually when I remove my old gelish, the product sometimes completely comes off on the cotton and nothing is left on my nail. I opened my foil to discover that I had broken a corner of my pointer fingernail on my left hand and the gelish had been holding it firmly in place. The broken nail was actually still stuck to the gelish on the cotton ball. In retrospect, I should have taken a picture because it was just soo unusual!
I was too tired last night to do more nail art, whoever, I did an extra one the night before! woohoo! On to the pictures!


I was too tired last night to do more nail art, whoever, I did an extra one the night before! woohoo! On to the pictures!

This is such a cute delicate design and I finally got around to it! I like the overall look, but I was sorely tempted to use a matte topcoat on the green - and I may still try it. I'm on the fence about it. I just love Emerald City so much!

That's pretty much it for today. I hope you enjoyed! I'm already planning my "Fish Egg Friday" Mani and I've got everything ready to go. So many ideas and the need to copy designs I've seen from the other ladies that I've had to write them all down so I don't forget! lol
Have a Groovy Monday!
Saturday, April 14, 2012
OPI Ink Stamping!
Good Morning! I hope you enjoyed yesterday's Fish Egg Friday post. I certainly enjoyed doing it and reading what everyone else came up with!
This morning's NOTD nail art is OPI's OPI Ink with a stamped design in silver. I was trying out different full nail stamp designs from the recent plates that I purchased. I got so many that it's going to take awhile for me to get through them all. Take a look!


This morning's NOTD nail art is OPI's OPI Ink with a stamped design in silver. I was trying out different full nail stamp designs from the recent plates that I purchased. I got so many that it's going to take awhile for me to get through them all. Take a look!

The design on the plate had half the nail covered with the stamped color as the background base color as a cut out and then switched on the other side to the exact opposite. No matter how many times I re-did it, I could not get the stamp to show the outlined flowers, only the cut-out side. Even though the full design didn't come out I still kind of liked it.

I tried to do it so you'd get different coverage on each nail, just to demonstrate how different it can look depending on how much you cover the nail with the design. I also took lots of pictures from different angles.


I hope you enjoyed today's post and thanks to everyone for their comments yesterday and the great participation from all the readers and the bloggers!! Have a groovy Saturday and enjoy the weekend!
Friday, April 13, 2012
Fish Egg Friday!!
I'm baaaaack!! I decided to go ahead and double post today and bring you "Fish Egg Friday"! This was a last minute blog community event and I'm very glad I decided to do this. I've never done a caviar manicure and I'm certainly glad I gave it a shot!! Look for more of these style nail art manicures in the future.
This style nail art first appeared on the runway last year at Mercedes Benz New York Fashion Week and you can read about Dashing Diva Pro's avant guarde look here. This is the specific look I attempted to replicate today! I apparently need to be clear about that since there's a DIY kit available by Ciate, a brand from the UK and it very much differs from the original look. Now on to the pictures!!


Here in the second shot, you can see how the glitter as become part of the texture. I used Orly's "Shine On Like a Diamond" as a top coat here both to get the glitter effect and to secure the beads to my nail firmly. I have previously discovered from working with micro-beads that using a fast dry top coat can sometimes effect the color of the beads by almost leeching the color from the beads and making it bleed into your design. If you want to skip my rant, just jump to the end to get a list of all the other gals participating today!
I am going to take a moment to talk about why I decided to participate in "Fish Egg Friday". I am a professional nail technician, I am licensed by my state and this "Ciate caviar manicure" product is not marketed to me as a professional. I also don't do product reviews except in the most incidental manner (I used this, I don't use that, etc.) This product is not even available in my area except online. The recent unprofessional conduct of their PR dept toward the beauty bloggers as a whole embarrasses me. Outside the fact that I am a former DIY-er who made the transition to professional, One of the things I enjoy about my profession is the industry as a whole and the professional code of conduct that doesn't include that sort of behavior. We don't put each other down publicly or behave negatively towards each other. This industry attracts certain types of people and those that flourish are caring, supportive, positive bundles of energy.
This is a unique industry. It's one of the few industries where duplication and imitation is what helps us grow, evolve and push us in new directions while still offering quality, iconic products/services. Offering consistent quality and accessibility is what gives your "branded technique" staying power not legal action against those who chose to not promote your product to achieve a look you didn't create. One has only to look into the history of the "French Manicure" to see an example of how it really works. Exclusivity and trademarking is not what has made this field the biggest growth industry at a time of world-wide recession. It has been it's accessibility of quality to the average person at every level which has made us all flourish.
I expect the folks at Ciate to follow in the footsteps of Max Factor and Orly and their "french manicure" and re-orient their PR staff appropriately. This type of behavior may work in other industries, but it doesn't fly in this one. Here, the rule of the day is either adjust the quality or adjust it's accessibility (price).
Thanks for hanging around to read my rant! Here's a list of the other bloggers participating in today's "Fish Egg Friday" be sure to check out their GREAT manicures cuz this is a amazing line-up!! The list keeps getting longer so be sure to check back and see all these new great caviar manis! You can also keep up with everyone else on twitter who's jumped in using #fisheggfriday!
This style nail art first appeared on the runway last year at Mercedes Benz New York Fashion Week and you can read about Dashing Diva Pro's avant guarde look here. This is the specific look I attempted to replicate today! I apparently need to be clear about that since there's a DIY kit available by Ciate, a brand from the UK and it very much differs from the original look. Now on to the pictures!!

These were all taken in bright sunlight to highlight the glitter and to demonstrate what a difference it makes to the overall look. Personally, I feel that without the glitter, the look risks looking like nothing more than a smudged up black nail from any distance. Let's be honest here, our nails don't get noticed up close unless we're in the habit of poking people in the eye.

Here in the second shot, you can see how the glitter as become part of the texture. I used Orly's "Shine On Like a Diamond" as a top coat here both to get the glitter effect and to secure the beads to my nail firmly. I have previously discovered from working with micro-beads that using a fast dry top coat can sometimes effect the color of the beads by almost leeching the color from the beads and making it bleed into your design. If you want to skip my rant, just jump to the end to get a list of all the other gals participating today!
~Rant Time~
I am going to take a moment to talk about why I decided to participate in "Fish Egg Friday". I am a professional nail technician, I am licensed by my state and this "Ciate caviar manicure" product is not marketed to me as a professional. I also don't do product reviews except in the most incidental manner (I used this, I don't use that, etc.) This product is not even available in my area except online. The recent unprofessional conduct of their PR dept toward the beauty bloggers as a whole embarrasses me. Outside the fact that I am a former DIY-er who made the transition to professional, One of the things I enjoy about my profession is the industry as a whole and the professional code of conduct that doesn't include that sort of behavior. We don't put each other down publicly or behave negatively towards each other. This industry attracts certain types of people and those that flourish are caring, supportive, positive bundles of energy.
This is a unique industry. It's one of the few industries where duplication and imitation is what helps us grow, evolve and push us in new directions while still offering quality, iconic products/services. Offering consistent quality and accessibility is what gives your "branded technique" staying power not legal action against those who chose to not promote your product to achieve a look you didn't create. One has only to look into the history of the "French Manicure" to see an example of how it really works. Exclusivity and trademarking is not what has made this field the biggest growth industry at a time of world-wide recession. It has been it's accessibility of quality to the average person at every level which has made us all flourish.
I expect the folks at Ciate to follow in the footsteps of Max Factor and Orly and their "french manicure" and re-orient their PR staff appropriately. This type of behavior may work in other industries, but it doesn't fly in this one. Here, the rule of the day is either adjust the quality or adjust it's accessibility (price).
Thanks for hanging around to read my rant! Here's a list of the other bloggers participating in today's "Fish Egg Friday" be sure to check out their GREAT manicures cuz this is a amazing line-up!! The list keeps getting longer so be sure to check back and see all these new great caviar manis! You can also keep up with everyone else on twitter who's jumped in using #fisheggfriday!
Can you be subtle with a color this vampy?
Happy Friday everyone! I hope you have a groovy week and are ready for the weekend!
I'm a huge fan of Sammy and her wicked stamping skills, and some of my favorites of hers are done with darker colors, so I decided to give it a shot. I love what I do, I love doing fun bold designs on myself, but I am a professional and it's usually not my tastes that I need to be catering to! I'm not a fan of dark nail polish colors but I just loved this one in the bottle since the moment I laid eyes on it. I was disappointed in how little glitter actually comes out on the nail - but those non-glittery clients I have (yes, they do exist!) actually like it that it isn't so glittery and sparkly. It's these gals that I had in mind for today.


I'm a huge fan of Sammy and her wicked stamping skills, and some of my favorites of hers are done with darker colors, so I decided to give it a shot. I love what I do, I love doing fun bold designs on myself, but I am a professional and it's usually not my tastes that I need to be catering to! I'm not a fan of dark nail polish colors but I just loved this one in the bottle since the moment I laid eyes on it. I was disappointed in how little glitter actually comes out on the nail - but those non-glittery clients I have (yes, they do exist!) actually like it that it isn't so glittery and sparkly. It's these gals that I had in mind for today.

I picked that stamp design because it's much more subtle without being almost invisible.The nail color is OPI's OPI Ink.

Here's another angle with the light coming from a different direction and you can see how the color goes from a bright blurple to almost black. It's not a duochrome but you definitely get different looks depending on the lighting. I find it much more suitable for a club than anything else but everyone has their own aesthetic.
I hope you enjoyed today's post and thanks for reading! See you tomorrow!
Thursday, April 12, 2012
Who knew I had this much pink?
Good Morning and Happy Friday Eve! Today's NOTD is actually the manicure nail art that I've been wearing all week! I decided I liked the girly pink with berry pink stamped over it so much that I went for another funky stamping design.


I'm not sure how I feel about it but I've certainly gotten lots of compliments on it.The picture above was taken indoors with bright light. The bottle I'm holding is actually the color I used to stamp with. It looks so dark spread on the nail and in the bottle but stamped, it's much more of a berry pink! This was my mystery Essie color and it's called "Swing Velvet" - Yay 4 Google helping me to ID it.

With lower light and a less obvious view of the bottle.
I hope you enjoyed today's design and tomorrow I'll have something much more vampy and suitable for Friday Night Life! Have a great day and thank you for reading!
Wednesday, April 11, 2012
Funky Retro NOTD
Good Morning and Happy Hump Day! Today's NOTD is definitely retro and funky. I am in a springtime mood but that seems to be expressing itself in contrasting colors with retro and funky stamping designs! I've decided to not fight that at all and just go with it and see where it takes me. Now, onto the pictures!


Sadly, no amount of adjustment using software is ever going to really show that awesome light pink. It's a bubblegum pink with a gold shimmer. It's Milani's "Sunkissed glow". I often call it my "barbie pink" lol

I did a few more of these designs yesterday, so look for them this week. I chose this color combo for my Mani of the week that I'll be walking around with for the next few days and I'll be showing off that design later in the week too!
Enjoy and have a groovy hump day!!
Monday, April 9, 2012
Sock Monkeys!!
Good Morning and Happy Monday!! Today's NOTD nail art design is Sock Monkeys.

Now most of us older people and a few younger people remember these toys. I saw this done on the internet somewhere and I just KNEW I had to do it!! Because who doesn't love sock monkeys????

I wore these for a week until I had seriously worn the tips off, you can see some of that in the pictures because I foolishly didn't photograph them right after I did it. But I LOVED wearing this and I will likely do that again. I know being a teacher all last week that the kids loved it too because I incorporated my monkey nails into songs about monkeys.
I hope you enjoyed today's nails and I'll be back with another nail design that I'll be wearing this week. I am absolutely in the mood to be rocking some spring themes!!
Sunday, April 8, 2012
Easter Designs
Good Morning and a Happy Easter to those that celebrate it!
I have two designs for you today! One was inspired by one of the other mom's at my daughter's school and the other is a culmination of all the things I've done this week. First I'm going to start with the one inspired by Kelly. She's a deeply religious christian gal and a real sweetheart. Her family celebrates the Easter season as a religious holiday only. That is what really inspired me to do this mani.


I have two designs for you today! One was inspired by one of the other mom's at my daughter's school and the other is a culmination of all the things I've done this week. First I'm going to start with the one inspired by Kelly. She's a deeply religious christian gal and a real sweetheart. Her family celebrates the Easter season as a religious holiday only. That is what really inspired me to do this mani.

That one is for you Kelly!!
My second one is the one I did for myself to wear today and tomorrow at the school Easter Egg Hunt. I decided to do a little of everything with this one. I loved the color polishes I chose for the Kelly inspired design so I went ahead and did that again for this one too.

My pre-schooler really likes this one and I did it more for her than for me. I hope you enjoyed today's designs and enjoy the holiday (for either religion) or if that's not your thing - you just have a great day!!
Saturday, April 7, 2012
10 Little Bunnies in a Row
Happy Saturday everyone! I hope your Holiday Weekend is off to a wonderful start! Tonight is the big night when many parents and children will be gathering around the table to color eggs to hide tomorrow! I know that's what we're doing tonight. This will be the first year that my youngest child will get to color eggs. Because of the huge age difference between her and her next oldest sister, it has been a few years since I've done this. I'm very excited and looking forward to this family activity!
In honor of the Big Hunt to begin tomorrow, I have Easter Bunnies for you!! I don't have very many pastel colors in my collection and where I was lacking, I mixed up some acrylic paint to fill in the voids!


I hope you enjoyed my little bunnies today and tomorrow's nail art will try to include everything that makes Easter special to those that celebrate it.
In honor of the Big Hunt to begin tomorrow, I have Easter Bunnies for you!! I don't have very many pastel colors in my collection and where I was lacking, I mixed up some acrylic paint to fill in the voids!


I easily could have taken 10 pictures of these cuties, but I think I will stop at just posting these two. The other two I have are pretty much identical to these two.
Subscribe to:
Posts (Atom)