Pages

Showing posts with label white. Show all posts

Sunday, August 12, 2012

Post Wedding Check-in

Well, I have made it through all the insanity and I think I managed to not loose my mind. lol We are now moved into our new place (though not completely) and we had a lovely wedding, and we're enjoying our "family honeymoon" this weekend. I'll be back to posting regularly, but initially, I will no longer be making daily posts. I will, however be posting at least once a week while I try to get our daily lives back to normal and get the lil one set up for the new school year.

Without further ado - I bring you a wedding photo! For the moment, it's the only one I have access to but I promise to post at least one more of the entire dress.


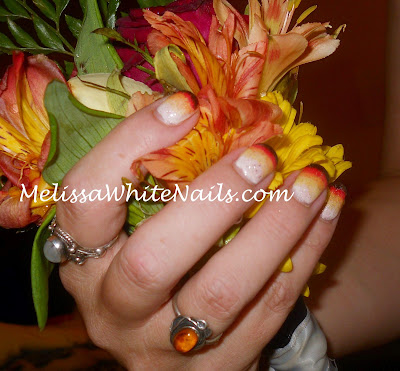
Of course, since this is a nail blog - this entry would not be complete without a photo of my manicure for the day!! I did my nails with Gelish and I took this picture almost a week later so there is some growth going on there. I still love the look!


The flowers are from my daughter's bouquet. She was one of my bridesmaids and I had to get the nails with the flowers becauses I did like my wedding flowers. I wonder how much of that is because I did my own flowers? haha! 

That's all for this week - I'll see you all next Sunday! Have a nailicious week!

Wednesday, April 25, 2012

Bridesmaids need polish too!

Good Morning and Happy Hump Day! I know this is a bridal series, but bridesmaids need polish too!! Today's nail art could work for a bride that has more bold tastes but it's really aimed at the bridesmaids. I decided to get a little wild with the watermarbling yesterday and I did this one too.


I used just Essie's "Swing Velvet" and OPI's "Fit for a Queenslander" from the Australian Collection in this watermarble. I then stamped using a silver foil a rose pattern. Because it's a silver foil, the stamped design is subtle and not immediately obvious. It does give it that something extra that I felt the plain watermarble was missing. 


Of course, this design is also good for Prom - which is fast approaching as well! I'm sure all us old folks remember prom, and some of the scary dresses we chose to wear. Now it's the younger girls turn to wear a dress they will be horrified by later in life. At least we can send 'em off wearing some timeless nails!

That's all for today. Tomorrow will be the last day of this week's bridal series and I'll be  finishing it off with another bold bridesmaid or prom look. Thanks for reading!!


Sunday, April 22, 2012

Hearts and Brides

Good Morning! I hope your Sunday is going well, I apologize for the lateness of my post but I'm a bit sick. With that in mind, I'm going to really short today. Enjoy!


Here I stamped the hearts in red, then stamped over them again in white to give the design the illusion of depth.


That's all I have for today, I hope you enjoyed. Have a great day and thank you for reading!

Friday, April 20, 2012

Bridal Roe!

Good Morning and Happy Friday!! Well after all the fun I had last week doing "Fish Egg Friday" I decided to do it again today. Also, I am starting a new theme for all my nail art - Bridal! So today, you're getting a little bit of a two-fer!

On to the mani!! I named this one "Bridal Roe" because firstly, it's a bridal mani and secondly because salmon is pink and today's fish eggs are definitely pink!


The base color here is OPI's "Kiss Me On My Tulips" and the beads are actually clear which lets the underlying mani colors show through. I've seen how awesome clear beads are over white (for winter/christmas) but they are even more stunning over color!


Here's a few macro shots of the "fish egg" part.


There is a little trick to getting the beads to lay flat and neat on the nail. The pictures below are the "tool" you need to do it and how to use it. 


I have no idea what the tool is called but I have several that came with nail art kits, like dried flowers, rhinestones and even a few puffy nail stickers. It looks similar to a cuticle pusher but rubber end makes that impractical. They are sooo handy for applying anything other than polish to your nail!


Do this step after you've sprinkled or dipped your nail in beads and tapped off the excess.

I got the inspiration for this one from last week's Fish Egg Friday Rant. French Manicure or Pink and Whites - it just seemed the perfect thing to make my statement! All this week has been a variety of Bridal Runway shows reminding me that Bridal season is here!! Yay! "This coming week, I'll be showing you the "Bridal Manicure" I"ll be sporting at my own wedding this summer! Have a Groovy Fishy Weekend! Thanks for reading!! If you did a fish egg Mani - let me know in the comments where to find it and I'll link to it here!

Other ladies posting for Fish Egg Friday:
NailArtAddict
Salla at Polish 'em
The Lacquerologist
Color is Magic
Thoughts of a Midwestern Girlie Girl
Nail Loopy
The Rock Chick Rambles
I Like To Talk Alot A few days old - but she did more than one rockin fish egg mani!

I'll be updating throughout the day since today's Fish Egg Friday is not an organized event like last week's. You can also share/follow FishEggFriday Mani's on twitter with the hashtag #FishEggFriday


Tuesday, April 17, 2012

Busy Bees

Good Morning and a Groovy Tuesday to you! I saw this awesome nail art yesterday on Nails Magazine's Nail Art Gallery and I knew right away I had to do it!!

So, in honor of the spring flowers, I bring you bees! You just can't have flowers without bees.


I am just in love with this nail art. It was much easier to do than I thought it would be. So either I'm getting much better at free-hand nail art, or it's easier than it looks. Maybe it's a combination of both! 


One more picture just because I think it's the cutest thing ever.


I used Sally Hansen's Xtreme Wear, "Mellow Yellow" for this. It's honestly the best yellow for all the nail art I've done over the years. I did the rest using Acrylic Paint which has quickly become a staple for me. 

Saturday, March 31, 2012

Fly Butterflies Fly

Happy Saturday to you! This morning's nail art is inspired by a few different things. The first one is the gazillion of butterflies we have everywhere happily flitting around a bunch of flowering weeds we have here and there. It adds to the ambiance, love to sit in my yard and just read a book in the sunshine! Add that to the many butterfly tutorial on YouTube and pinterest - there's no way I can NOT do at least one.


I think I went a little too over the top with the dots, but I can always do less dots going forward. 


That's going to be it for today - I hope your weekend is off to a great start!!

Wednesday, March 28, 2012

Black, White and Dotted All Over

Happy Hump Day! Today I bring you another nail art from my pinterest "to-do" list".  I seriously considered doing this one using microbeads, but decided against it until I was sure I could do it using a plain old dotting tool.


There is something just inherently cool about the design and the fact that it's all done in dots. Simple but funky at the same time. What I find interesting is that you could use this design as an accent nail and do the rest of your nails with just the bottom dots........or do all 10 of your nails using the whole design like the pinterest photo.

I think if I do this design using micro-beads, I'll have to modify this design a bit, make the top "half" into a whole and center that on the nail more. Maybe use rhinestones for the large dots across the free edge? Definitely add that to my "to-do" list. 

Funny how I keep doing designs from my list, but the list keep getting longer!!

Thursday, March 22, 2012

More Experimental Nail Art

Happy Friday Eve to you!!  Today I have some more experimental nail art to show you.  This time I'll be showing you two Gelish nail arts. I usually do just the Gelish as my base color, but these are completely done using Gelish polishes.


You can see the larger pieces of holo glitter in this photo and some of the pink holo shimmer as well. It's super sparkly that's for sure!!


This second one is a super glittery sunset with a beaded palm tree done in black. This is the same glitter I used in the one above but it doesn't quite catch the "holo" like the one above did. I was dying to do something beaded with the gel and here it the first one! 

That's it for today. I'll be back tomorrow to show you some of my first attempts at using acrylic paints with nail polish to make flowers. I twitted some of them yesterday if you care to scroll back through my tweets to get a sneak peek!

Tuesday, March 20, 2012

Daisies in a field of green

Good Morning! Today I will be showing you my current mani that I've been wearing since Sunday! I stayed up pretty late Saturday night working on this because it takes me so long to take off the old Gelish colors. Since it's me doing it, I can only do one hand at a time, so it takes twice as long. I also couldn't decide what I wanted to do with this fabulous green!! I had been watching videos on you tube, by love4nails and one of her videos showed a different technique for doing flower petals than the one I had been using. I ultimately decided to give this a try, and here it is.


I had to take these with my phone, so I apologize if the photos are of a poorer quality.

I definitely like this technique. I'm not totally ready to dump the other method just yet, but I definitely believe that this would be ideal to use with Gelish. I also want to comment on the green color here. It's a shimmery frosted green and I really am amazed just how much I like it once I got it on and got it cured. I couldn't resist doing daisies since daisies are the perfect design to go with a green background!  I hope you enjoyed and strongly encourage you to check out the other videos on love4nails' youtube channel!! 

Do you watch a lot of youtube tutorials? Who are your favorites? 

Monday, March 19, 2012

Oh how I love you, Ruby Slippers!

Happy Monday everyone!! Today I'm very excited to show you a new Nail Art using my all-time favorite polish: China Glaze's "Ruby Slippers". On my recent trip to Sally's to score my Hunger Games polishes, I just couldn't resist snatching up the last full sized bottle of "Ruby Slippers". It's for my personal stash and not to be used for clients, and the only polish I own that is just for me.

As many of you know, I am on twitter and I follow many fellow bloggers as well as several companies who produce products I use on myself and clients, recommend for use by my clients at home and many awesome Nail Techs who's skill levels I hope to one day reach. This afternoon, Cutex asked if we could only wear one polish for the rest of our lives, what would it be? Of course, I answered "Ruby Slippers". Duh.

I still had that in mind when I was looking at my list of "must try" board on pinterest. Taking a look at this, I knew exactly which manicure I'd be doing for today!


It's not exactly like the one on pinterest, but I didn't really intend for this to be exactly the same either like yesterday's was.


Even though I knew I'd have to change this less than 24 hours later, I just couldn't bring myself to take this one off right away. I mean, it's got Ruby Slippers in it!! I really do love it that much.


Sunday, March 18, 2012

Roll of the Dice

Good Morning Sunshine! Today, I have another one of those nail arts I found on pinterest that was definitely simple but completely brilliant! Let's get right to the pictures, shall we?!

The order of the dice are as random as my brain can make them and they hold no special significance to me.


I would call these my gambling nails!! We have more than a few different casinos near us and we've been known to frequent them. I'm a big bingo hound, harking back to when I was little and my Mother, all my Aunts and my Grandmother used to go to bingo at least once a week at various different churches around Boston. It also reminds me of sitting around the table after Christmas dinner and playing "penny craps". Yah, I know, my family is totally weird and I wouldn't trade them for anything.  But we always had cards and dice in the house and everyone knew when to quit while we were ahead!

I hope you enjoyed today's Nail Arts and a peek at my crazy extended family! 

Wednesday, March 14, 2012

Ireland

Good Morning and Happy Hump Day! The week is now half over, and I did indeed get to spend a few hours working on nail art. Not all my designs worked out, so I'm going to try again tonight but some of the designs did come out very well. This morning's nail art is not especially challenging, but what collection of St. Patrick's Day themed Nail Art would be complete without the Irish flag?


I have more pictures, but they all essentially look exactly the same as that one. I really like flag nail art - it's really a lot of fun, some are more simple than others, but it's fun to wear and fun for me to do! Tomorrow, I have a really awesome nail art to bring you. I had the same idea as someone else but I added a little twist to it just to separate it from the other "Great Minds Think Alike" mani. 

See you tomorrow and have a Groovy Hump Day!