My geek seems to be showing this week in my titles. That's ok, I have geek pride.
I'm really excited to show these nails this week. I finished them off this afternoon, got the pictures taken, edited and watermarked and now it's time to get down to business!
Showing posts with label green. Show all posts
Showing posts with label green. Show all posts
Friday, February 15, 2013

Friday, April 27, 2012
Emerald City Caviar
Good Morning and Happy Friday!! The weekend is finally here!! It has been a tough week for me as myself and the little one have been suffering from a lingering cold. We're finally on the mend and looking forward to getting out in the sunshine over the weekend!
I am doing another #fisheggfriday post today. I thought I'd do something just a little bit different than my normal post. Reading all the posts that have been done in the past few weeks, the single biggest complaint is how impractical it is. Beads flying off everywhere and it catching on everything. Which got me to thinking, what can I do to make the beads stick really stick?? I had a few ideas and decided I'd try them out and see how it all holds up.
Here is my nails just done with Sally Hansen's Xtreme Wear "Emerald City", on my right hand.


I am doing another #fisheggfriday post today. I thought I'd do something just a little bit different than my normal post. Reading all the posts that have been done in the past few weeks, the single biggest complaint is how impractical it is. Beads flying off everywhere and it catching on everything. Which got me to thinking, what can I do to make the beads stick really stick?? I had a few ideas and decided I'd try them out and see how it all holds up.
Here is my nails just done with Sally Hansen's Xtreme Wear "Emerald City", on my right hand.

The same on my left. You'll notice I clearly do not take pictures very well using my right hand.

Here's my left hand after applying microbeads. I did this a little different than most of the DIY steps you see in the blogs. I let the entire mani dry and then, one nail at a time, used one thick coat of Seche Vite and sprinkled the microbeads, while it was still wet. I then pressed the beads down and trimmed as needed. I repeated the process for each finger. Once all the nails on that hand were covered in beads, I dabbed on a goat of glitter by laying the brush parallel to my nail as I dabbed rather than at a perpendicular angle when I'm brushing on polish. I let that fully dry. Finally, I lightly brushed on a coat of old thick Seche Vite to really secure the beads. Here's my right hand.

My left hand, I apologize for the poor picture quality.

You can really see on the picture of my left hand that the final coat of thick Seche Vite took away some of the texture of the beads. This was not much of a surprise. I noticed some times ago that old thick fast dry top coats can be great when applied to nail art that has texture and you would rather it not. You simply use your fresh fast dry top coat to seal in the design and when it is dry - apply the old top coat to give your nails a slick smooth appearance and texture. Sammasaurus also uses this technique. I was not unhappy with the look of this though.
By the end of the day, I hated it. The beads really did catch on everything and it just felt awkward and wrong. I seriously regretted doing this on all ten of my fingers. The blue and green colors that the clear microbeads brought out of the polish were awesome, I managed to keep the beads on my fingers and not all over the place but it was still completely unwearable like this. Here it is again, three days later.
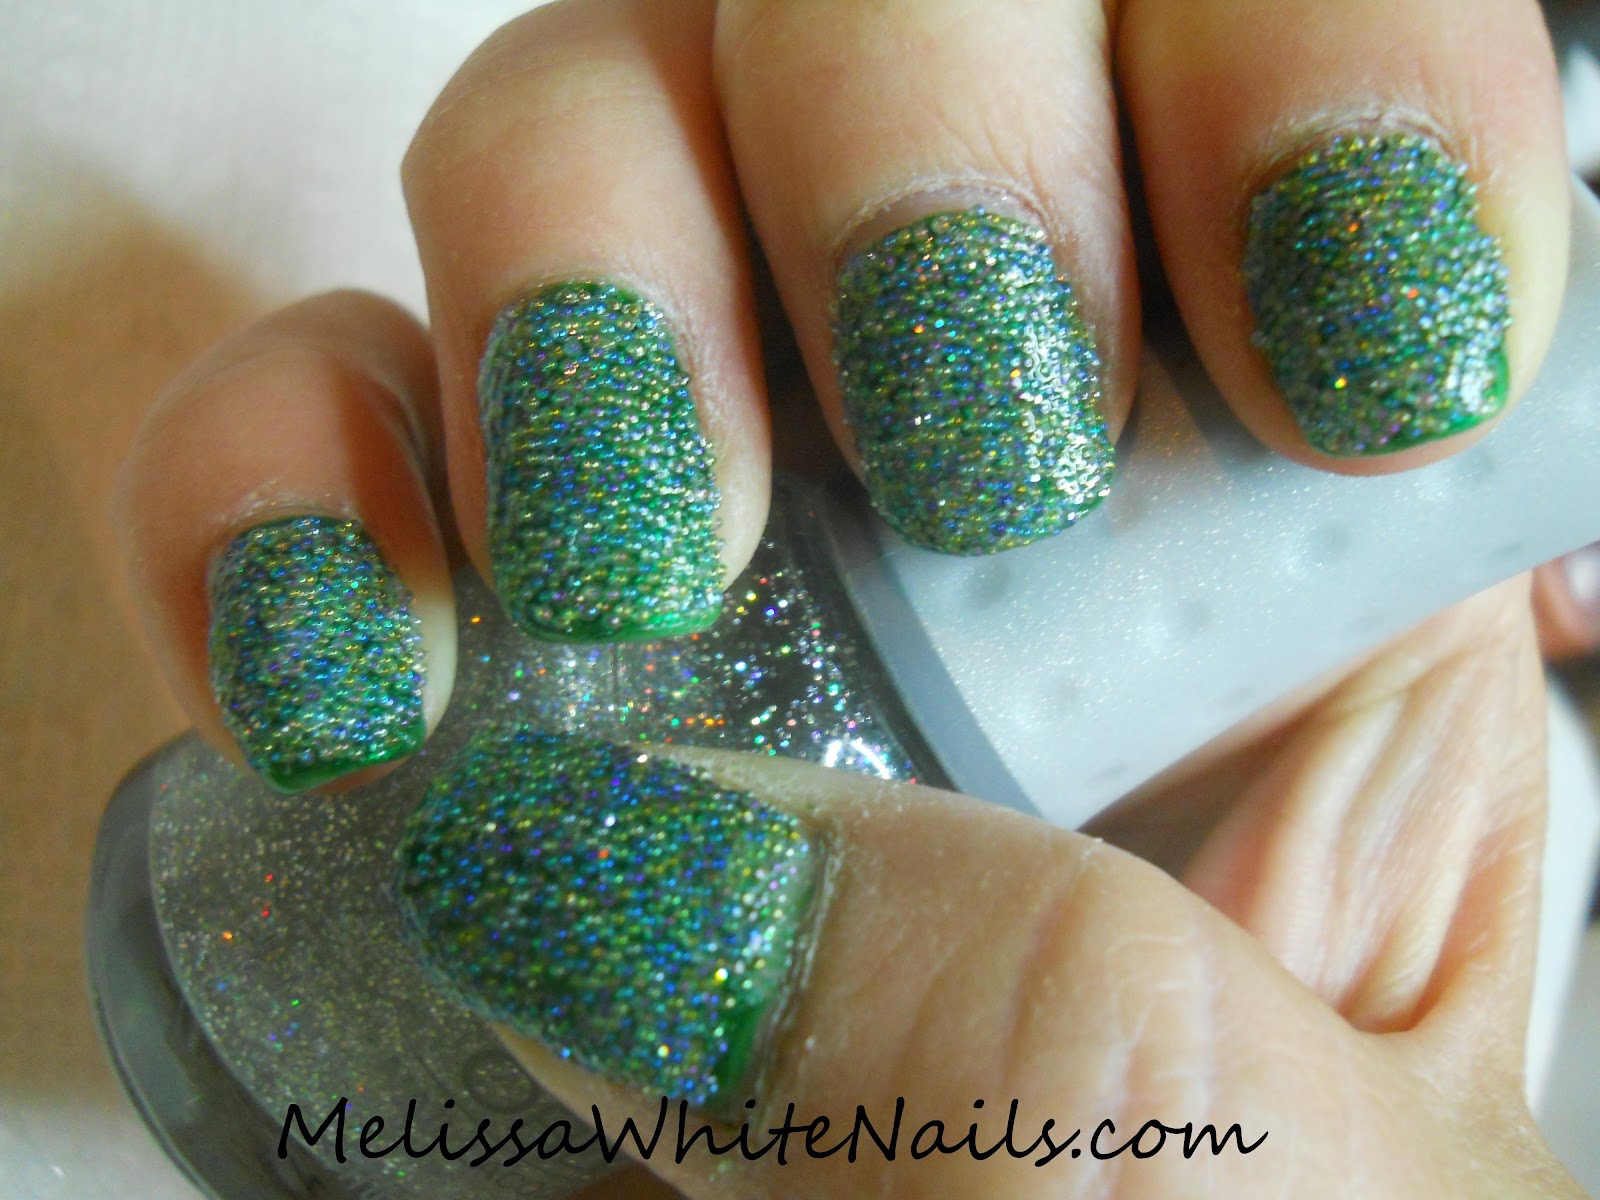

Virtually no difference in how it looked but still not nearly as wearable as I'd hoped. I think this is a doable as an everyday look if one restricts it to just an accent nail on the ring finger, which is our least used and weakest finger.. It truly was annoying because it was on ALL my fingers.
I want to note here that I did remove it and I did NOT use acetone or any nail polish remover to remove this. I used my Gelish remover to get the beads off my fingers. I simply soaked a cotton ball with Gelish remover, laid it on my nail and wrapped the whole finger in foil. I let it soak for a full five minutes and the beads and most of the polish simply wiped off. It's also great for removing glitters the same way. I often use my Gelish remover to remove old acrylic enhancements for clients as well the Gelish polish it's designed to remove. I chose to use this product instead of Acetone because it's not nearly as rough on my nails and cuticles as Acetone is. The product is too expensive to be used simply as a polish remover - but it certainly save time and work when removing more difficult things like a nail full of microbeads that are swimming in that much topcoat or glitters and jelly sandwiches. The remover is available on Sally Beauty Supply's website. Larger sizes are available through independent distributors of Nail .Harmony products.
I hope you enjoyed reading about my experiment today and Thank You for reading! Don't forget you can follow "Fish Egg Friday" on twitter with the hashtag #fisheggfriday.
Monday, April 23, 2012
Delicate Bridal
Good Morning and Happy Monday! I'm off teaching preschool today, I was supposed to have the day off but I volunteered to cover for one of the other mom's who sprained her wrist. Poor girl has this HUGE splint on it and she really can't do anything with it. Besides, I like teaching these kids and there's not that many weeks left in the school year.
On to today's nail art. This is one I did during Valentine's but I find it still very much appropriate for the bridal season.


On to today's nail art. This is one I did during Valentine's but I find it still very much appropriate for the bridal season.

I decided to do today's pix large because this is such a delicate design, I really want you to see it properly.

The base color is a Gelish color, Taffeta with red and green polish stamped over it. A little regular nail polish remover and the bride is sporting a low-key but pretty look for the honeymoon!
That's it for today, tomorrow I will show the mani I have planned for my own wedding this summer. To say it's a bit non-traditional would be an understatement. Thank you for reading and have a Groovy day!
Monday, April 16, 2012
Spring Green
Happy Monday!! I hope everyone enjoyed their weekend. I certainly did! I changed my gelish last night and it was completely weird! Usually when I remove my old gelish, the product sometimes completely comes off on the cotton and nothing is left on my nail. I opened my foil to discover that I had broken a corner of my pointer fingernail on my left hand and the gelish had been holding it firmly in place. The broken nail was actually still stuck to the gelish on the cotton ball. In retrospect, I should have taken a picture because it was just soo unusual!
I was too tired last night to do more nail art, whoever, I did an extra one the night before! woohoo! On to the pictures!


I was too tired last night to do more nail art, whoever, I did an extra one the night before! woohoo! On to the pictures!

This is such a cute delicate design and I finally got around to it! I like the overall look, but I was sorely tempted to use a matte topcoat on the green - and I may still try it. I'm on the fence about it. I just love Emerald City so much!

That's pretty much it for today. I hope you enjoyed! I'm already planning my "Fish Egg Friday" Mani and I've got everything ready to go. So many ideas and the need to copy designs I've seen from the other ladies that I've had to write them all down so I don't forget! lol
Have a Groovy Monday!
Tuesday, April 10, 2012
Paisley Spring Stamping!
So, a few weeks ago I picked up another bottle of Sally Hansen's Xtreme Wear "Emerald City" and the package was a two for one at the dollar store. I'll be honest and say that I took every package they had because "Emerald City" is a discontinued color and I have yet to find another one to replace that shade of green. It truly is my "go-to green" for nail art!
One of those packages came with a lighter green and I loved how that looked with my Easter Day Mani's. Pastel green AND sparkley? I'm totally in. I'm still very much into funky stamping patterns and here's today's combination!!
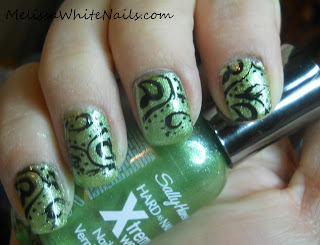
One of those packages came with a lighter green and I loved how that looked with my Easter Day Mani's. Pastel green AND sparkley? I'm totally in. I'm still very much into funky stamping patterns and here's today's combination!!

The green looks way more frosty in these pictures, but a "sparkling frost" would be a more accurate description. I really like this - it suits my funky mood this week!! Spring is in the air and I'm feeling funky!
Thanks for reading and I hope you have a great day or night wherever you are!
Sunday, April 8, 2012
Easter Designs
Good Morning and a Happy Easter to those that celebrate it!
I have two designs for you today! One was inspired by one of the other mom's at my daughter's school and the other is a culmination of all the things I've done this week. First I'm going to start with the one inspired by Kelly. She's a deeply religious christian gal and a real sweetheart. Her family celebrates the Easter season as a religious holiday only. That is what really inspired me to do this mani.


I have two designs for you today! One was inspired by one of the other mom's at my daughter's school and the other is a culmination of all the things I've done this week. First I'm going to start with the one inspired by Kelly. She's a deeply religious christian gal and a real sweetheart. Her family celebrates the Easter season as a religious holiday only. That is what really inspired me to do this mani.

That one is for you Kelly!!
My second one is the one I did for myself to wear today and tomorrow at the school Easter Egg Hunt. I decided to do a little of everything with this one. I loved the color polishes I chose for the Kelly inspired design so I went ahead and did that again for this one too.

My pre-schooler really likes this one and I did it more for her than for me. I hope you enjoyed today's designs and enjoy the holiday (for either religion) or if that's not your thing - you just have a great day!!
Sunday, March 25, 2012
Dissatisfaction
Good Morning! I know my blog post is late but I was just too tired last night to write it and severely lacking in the inspiration. I had done my latest Gelish in this lovely green. It's an amazing sparkly green and I love the color. You might have noticed that my last few posts have not featured my hands, a large part of that is because many of the nail arts I wanted to do just don't go with this color and one of the designs I apparently am unable to do on my own nails.
All that being said, I still tried to do a nail art with this color and I'm just not satisfied with it. All is not lost though!! I finally got my order from born pretty store.


All that being said, I still tried to do a nail art with this color and I'm just not satisfied with it. All is not lost though!! I finally got my order from born pretty store.

As you can see from the picture, that's a whole lot of stamping plates but it also is dried flowers (clear round containers) and resin rhinestones (in the little baggie). With much encouragement from my significant other, I ran to my studio to check them out.
Again, the color became an issue but I think I did ok moving past it.

Going forward, I'll have to keep in mind that this color really is only for wearing by itself. In the meantime, I'm taking it off a week early and I think I'll go with a clear for now and start wearing some of my bolder nail arts on both hands!
Wednesday, March 21, 2012
Experimental Nail Art
Good Morning and Happy Hump Day!! Last night I started working on a side project I have been wanting to try out. I did nail art on some tips and then using "press on" glue, took the pictures. The experimental part of this was how to paint loose tips? When practicing, I've always just used nail glue or super glue to glue it to an orange stick. Regular white glue works well too, and the nail pops off clean, which doesn't happen with other types of glue. So, on to the pictures!


Not everything was successful with lil experiment. My more elaborate accent nail got messed up and as you can see there's other minor lil things where beads fell off or the design ran. Next I will try this out using Gelish over those lil cheap press-on nails you buy at the dollar store. The beads are much more secure with the Gelish when in delicate designs and the nails are reuseable if you used "press on" adhesive.
Have you ever purchased nails with nail art already on them from someplace like etsy? If you do nail art - would you ever consider doing something like this?
Tuesday, March 20, 2012
Daisies in a field of green
Good Morning! Today I will be showing you my current mani that I've been wearing since Sunday! I stayed up pretty late Saturday night working on this because it takes me so long to take off the old Gelish colors. Since it's me doing it, I can only do one hand at a time, so it takes twice as long. I also couldn't decide what I wanted to do with this fabulous green!! I had been watching videos on you tube, by love4nails and one of her videos showed a different technique for doing flower petals than the one I had been using. I ultimately decided to give this a try, and here it is.


I had to take these with my phone, so I apologize if the photos are of a poorer quality.

I definitely like this technique. I'm not totally ready to dump the other method just yet, but I definitely believe that this would be ideal to use with Gelish. I also want to comment on the green color here. It's a shimmery frosted green and I really am amazed just how much I like it once I got it on and got it cured. I couldn't resist doing daisies since daisies are the perfect design to go with a green background! I hope you enjoyed and strongly encourage you to check out the other videos on love4nails' youtube channel!!
Do you watch a lot of youtube tutorials? Who are your favorites?
Friday, March 16, 2012
Leprechauns!
Happy Friday everyone!! I have a crazy day ahead of me today and I am so very excited to show you this one today. This might look vaguely familiar and I had to do this one a few times before I was satisfied with it.
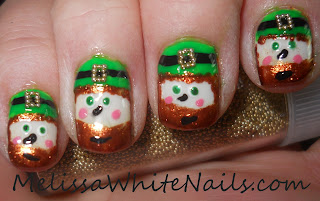


This one really required much tweaking. If this didn't look familiar to you - it's actually an irish twist on my Santa Nail Art.

I'm super pleased with myself for sticking it out and getting this one to come out the way I wanted it to. It's cute and fun! Happy Friday to all and remember - be safe is you start your St Patrick's Day celebrations a day early!!


This one really required much tweaking. If this didn't look familiar to you - it's actually an irish twist on my Santa Nail Art.

I'm super pleased with myself for sticking it out and getting this one to come out the way I wanted it to. It's cute and fun! Happy Friday to all and remember - be safe is you start your St Patrick's Day celebrations a day early!!
Thursday, March 15, 2012
Shamrocks Rock
Happy Thursday and I hope all with well! I've already finished taking photos of the Mani's for this week, I just haven't decided which one to wear on St. Patrick's Day! I'll be at the South Florida's Palm Society's Palm Show and Sale that day, so lots of people will actually see whatever I decide to wear that day!
Continuing with this week's Irish theme, today I bring you Shamrocks! I got this design off Robin Moses Nail Art Tutorial. I love her tutorials - it's all so cute and once you master a design, you can add your own touches to make them your own!


Continuing with this week's Irish theme, today I bring you Shamrocks! I got this design off Robin Moses Nail Art Tutorial. I love her tutorials - it's all so cute and once you master a design, you can add your own touches to make them your own!

No matter what I did could NOT get this lime green to come out true. This was as close as I could get it to the lime green it actually is.


I know that yesterday I promised to post a nail art where I had the same idea as someone else with my own twist, but I decided that I loved that one so much, I am waiting to post it for St. Patrick's Day itself! I think this one is just too cute to not post right away!
Have a Happy Friday Eve!!
Have a Happy Friday Eve!!
Wednesday, March 14, 2012
Ireland
Good Morning and Happy Hump Day! The week is now half over, and I did indeed get to spend a few hours working on nail art. Not all my designs worked out, so I'm going to try again tonight but some of the designs did come out very well. This morning's nail art is not especially challenging, but what collection of St. Patrick's Day themed Nail Art would be complete without the Irish flag?


I have more pictures, but they all essentially look exactly the same as that one. I really like flag nail art - it's really a lot of fun, some are more simple than others, but it's fun to wear and fun for me to do! Tomorrow, I have a really awesome nail art to bring you. I had the same idea as someone else but I added a little twist to it just to separate it from the other "Great Minds Think Alike" mani.
See you tomorrow and have a Groovy Hump Day!
Tuesday, March 13, 2012
A More Subtle Approach
Good Afternoon! Today's post is a little later than normal because we spent all day yesterday welcoming my mother and father-in-law home after a two month cruise. After a wonderful but exhausting day, I was just too tired last night to remove my Gelish. I have been able to get to it and now I've found the time to post pictures of my efforts.
I decided to keep my gelish simple and just use a simple white. It's great as a background color and also great for putting polishes over. Since St. Patrick's Day is this Saturday, I thought I'd begin showing some St. Patrick's Day themed Nail Art.
Today's Nail Art I thought I would skip the obvious shamrock and go for something more subtle. I happened to have this design on my stamping plate and it always brings to mind "Celtic Knotwork". I thought it would be perfect for this one.


I decided to keep my gelish simple and just use a simple white. It's great as a background color and also great for putting polishes over. Since St. Patrick's Day is this Saturday, I thought I'd begin showing some St. Patrick's Day themed Nail Art.
Today's Nail Art I thought I would skip the obvious shamrock and go for something more subtle. I happened to have this design on my stamping plate and it always brings to mind "Celtic Knotwork". I thought it would be perfect for this one.

The green and orange are from the Irish Flag and I felt mixed with the knotwork, it would be a more subtle "Ode to Ireland". I'll leave it to you to decide how that worked, I personally like it.

And one more just because I can and have them today.

Here's a few more in the shade.


So that's about it for today. I'll be doing some more art later today to post during the rest of the week. I wonder if I can find a way to put "Guinness" on my nails? Because what's St. Patrick's Day without Guinness??
Tuesday, February 28, 2012
A Hint of Monet
Good Morning Everyone! I hope you are all having a wonderful day. I've always been a big fan of the Fine Arts, I'm a long time visitor to the Museum of Fine Arts Boston and if I were in the right tax bracket, I would be one of their "Patrons". lol
I was inspired for today's Nail Art by Monet and his landscapes. I used one of my stamping plates (I have no idea who puts it out) but it is a little pebble pattern. I used the same design over and over in different shades to try and get same effect. One of the colors didn't transfer so so nice..but I kept it anyway because it fit in the with the theme. You can see it poking out from behind my smile line.
Now for pix!

I was inspired for today's Nail Art by Monet and his landscapes. I used one of my stamping plates (I have no idea who puts it out) but it is a little pebble pattern. I used the same design over and over in different shades to try and get same effect. One of the colors didn't transfer so so nice..but I kept it anyway because it fit in the with the theme. You can see it poking out from behind my smile line.
Now for pix!

I hope you enjoyed my interpretation of Monet!
Monday, February 27, 2012
Beaded Palm Tree
Happy Monday Blogland!! I've got a fresh pot of coffee on and it's time to get to today's Nail Art.
As I have previously threatened, I found some designs to create with my new microbead set. In fact, I went and bought another set to go with the first...just for the variety of colors. For today's Nail Art I only did the beaded design on one accent nail but this could easily be worn on all five fingers. Most of my pictures here are done in my spare time and these days I just don't have as much of that as I'd like. But who does?
On to the Design!


As I have previously threatened, I found some designs to create with my new microbead set. In fact, I went and bought another set to go with the first...just for the variety of colors. For today's Nail Art I only did the beaded design on one accent nail but this could easily be worn on all five fingers. Most of my pictures here are done in my spare time and these days I just don't have as much of that as I'd like. But who does?
On to the Design!

Here's another shot of it, I am still having a lot of difficulties working out getting that Gelish base color to come out "true" in the photos.

In case you didn't get to yesterday's post...the base color here is Gelish's "Taffeta". It's one of the two colors that comes in their basic kit, and it's the color I prefer to use on a basic french manicure.
What do you think? Would you even attempt something like this if you had the time?
Friday, February 24, 2012
Late Nite Art
Ok, now I'm back to the Nail Art photos. You'll have to forgive me, I attempted to do a Gelish fill in last night after 1 am. Soo very sloppy. :( However, I felt compelled to do some nail art tonight anyway. Tonight, I'll be doing two nail arts!
The first one is a fishnet stamping design and I took the time to add beads to an accent nail. While editing the pictures, I realized that I probably should have done that with all the nails instead of just the one. It came out better than I originally thought.


The first one is a fishnet stamping design and I took the time to add beads to an accent nail. While editing the pictures, I realized that I probably should have done that with all the nails instead of just the one. It came out better than I originally thought.

The second one is drastically different. I saw on IvanaThinksPink's blog where she did stamping with more than one color. I couldn't resist trying out her technique and woohooo! It came out purty darn nice!!

I am less than happy with both of these - it is starting to show that I have not done nail art in almost a week.
However, I was able to finally make some purchases of Nail Supplies. Most of the things I purchased were basic supplies I was running seriously low on. Monomer and Nail Powder. At this moment I do not offer acrylic services to clients in their home (and right now I'm only doing in-home/in-office appts) I do plan to either offer that or return to the salon full time in the future. That being said, I have only been a nail tech for a few years now, so I need to practice regularly so that I am not rusty and sloppy when I begin doing this service for clients. My big purchase was a new LED UV lamp. I did buy the higher end model but the difference in price was not so much that it made sense to me to buy the other one and go back later for that one.
Today I went and got a new haircut. I'm completely in love with it!!
Thursday, February 16, 2012
Longing for Spring
Today's post features flower nail art. I used my stamping plates for the flowers and used a super fine tipped brush to "color in" the leaves a different color. I know that roses don't naturally occure in this particular shade, but I just love how OPI's "OPI Ink" works with stamping plates!


Yes, that is still my Gelish Mani color, "Go Girl" as the base color, and as I already mentioned, the roses are OPI's "OPI Ink". I used Sally Hansen's Xtreme wear "Emerald City" to color in the leaves. The pictures here just doesn't do this one justice, if I get the chance, I'll be doing this one again during a day where I can get pictures in the full sunlight!
Hope you enjoyed - Have a Groovy Day!!
Subscribe to:
Posts (Atom)