Wooo!! It's cold here today!! I know some of ya'll aren't nearly this cold but to me it's FREEZING!! I live down here in the Everglades because of the subtropical climate....now where is my subtropical climate??
I haven't done much nail art over the last few months...and honestly, for awhile there I was walking around with BARE NAILS!! oh the horror!! Seriously. Right now I have zero color on my nail but I do at least have a clear coat of Gelish to protect my nails. They got so raggedy I couldn't take it anymore. I just cut them down to nubs and put the clear coat on so I could grow them out again.
I thought I would go ahead and post a few of the pictures of Nail Art I've done when I did it.
Showing posts with label Nail Art. Show all posts
Showing posts with label Nail Art. Show all posts
Wednesday, January 22, 2014

Saturday, April 28, 2012
Gel-ly Sandwiches
Good Morning and a wonderful Saturday to you! I'm soo excited about today's Nail Art. After removing my Emeral Fish Egg Mani, I also removed all my Gelish polish. Time for a new Gelish Manicure! After seeing the many "jelly" themed tweets and blog posts by Jeanette at the swatcholic I was completely inspired to see how a "Gelly" sandwich would look using my Gelish.
For those that are not familiar with the term "jelly sandwich" it's a layering technique involving using "jelly finish" polishes with a layer of glitter in between. Now Gelish doesn't have a "jelly finish", however, it does have shades that are sheer which would work like a 'jelly', and some very nice glitters. You'll have to pardon the low lighting here - using flash and bright light, you just couldn't see any of the glitter or the effects that it actually has.


For those that are not familiar with the term "jelly sandwich" it's a layering technique involving using "jelly finish" polishes with a layer of glitter in between. Now Gelish doesn't have a "jelly finish", however, it does have shades that are sheer which would work like a 'jelly', and some very nice glitters. You'll have to pardon the low lighting here - using flash and bright light, you just couldn't see any of the glitter or the effects that it actually has.

For this one I used my old favorite "Taffeta" and layered it over "June Bride". The silky finish of "Taffeta" over the glittery goodness is just stunning!! I love love love this!! So I'm going to show you another photo.

If you want to get a really close look - just click the pictures and you can see how great this effect is.

Then I decided to go ahead and stamp over it a tiger pattern using a berry polish and the glitter shows through that too which is just as amazing.

You can clearly see one of the larger pieces of holo glitter shining through the stripes on my middle finger and it's just amazing. I love this look and I think I'll be sporting it more often!
I hope you enjoyed today's Gelishicious Gelly Sandwich and thanks for reading!!
Friday, April 27, 2012
Emerald City Caviar
Good Morning and Happy Friday!! The weekend is finally here!! It has been a tough week for me as myself and the little one have been suffering from a lingering cold. We're finally on the mend and looking forward to getting out in the sunshine over the weekend!
I am doing another #fisheggfriday post today. I thought I'd do something just a little bit different than my normal post. Reading all the posts that have been done in the past few weeks, the single biggest complaint is how impractical it is. Beads flying off everywhere and it catching on everything. Which got me to thinking, what can I do to make the beads stick really stick?? I had a few ideas and decided I'd try them out and see how it all holds up.
Here is my nails just done with Sally Hansen's Xtreme Wear "Emerald City", on my right hand.


I am doing another #fisheggfriday post today. I thought I'd do something just a little bit different than my normal post. Reading all the posts that have been done in the past few weeks, the single biggest complaint is how impractical it is. Beads flying off everywhere and it catching on everything. Which got me to thinking, what can I do to make the beads stick really stick?? I had a few ideas and decided I'd try them out and see how it all holds up.
Here is my nails just done with Sally Hansen's Xtreme Wear "Emerald City", on my right hand.

The same on my left. You'll notice I clearly do not take pictures very well using my right hand.

Here's my left hand after applying microbeads. I did this a little different than most of the DIY steps you see in the blogs. I let the entire mani dry and then, one nail at a time, used one thick coat of Seche Vite and sprinkled the microbeads, while it was still wet. I then pressed the beads down and trimmed as needed. I repeated the process for each finger. Once all the nails on that hand were covered in beads, I dabbed on a goat of glitter by laying the brush parallel to my nail as I dabbed rather than at a perpendicular angle when I'm brushing on polish. I let that fully dry. Finally, I lightly brushed on a coat of old thick Seche Vite to really secure the beads. Here's my right hand.

My left hand, I apologize for the poor picture quality.

You can really see on the picture of my left hand that the final coat of thick Seche Vite took away some of the texture of the beads. This was not much of a surprise. I noticed some times ago that old thick fast dry top coats can be great when applied to nail art that has texture and you would rather it not. You simply use your fresh fast dry top coat to seal in the design and when it is dry - apply the old top coat to give your nails a slick smooth appearance and texture. Sammasaurus also uses this technique. I was not unhappy with the look of this though.
By the end of the day, I hated it. The beads really did catch on everything and it just felt awkward and wrong. I seriously regretted doing this on all ten of my fingers. The blue and green colors that the clear microbeads brought out of the polish were awesome, I managed to keep the beads on my fingers and not all over the place but it was still completely unwearable like this. Here it is again, three days later.
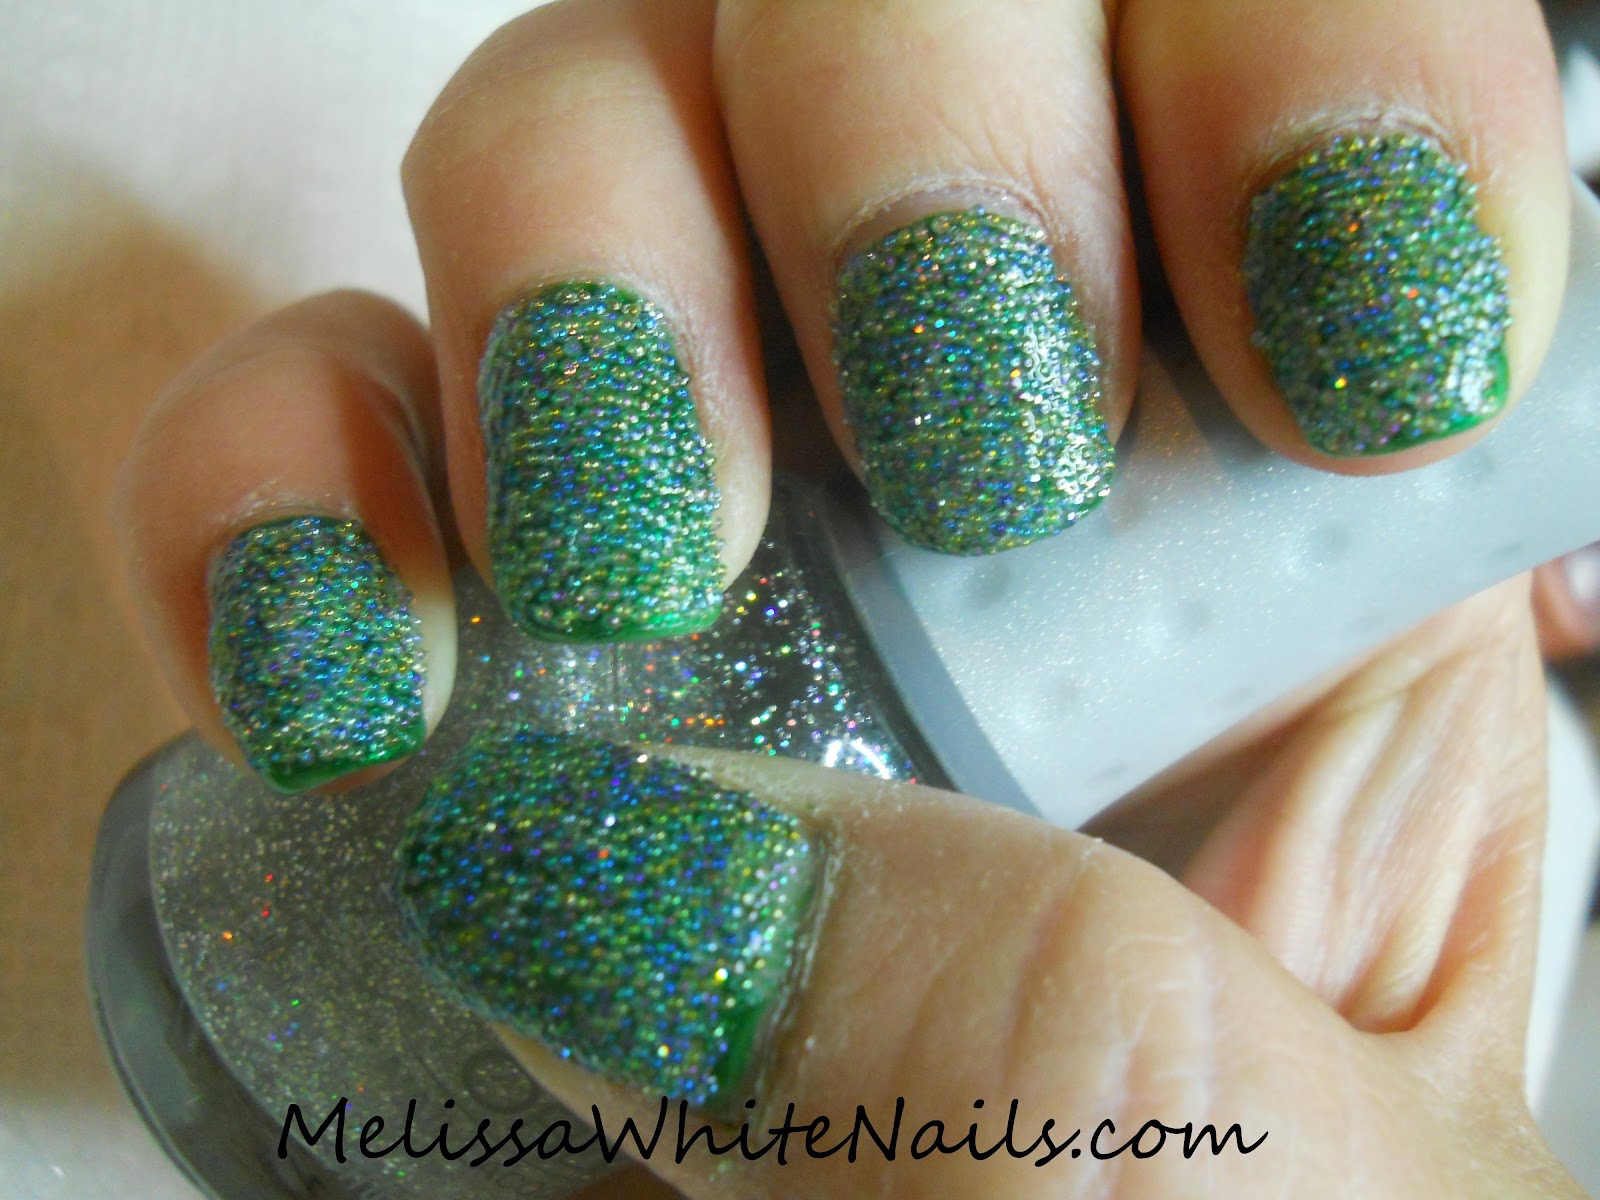

Virtually no difference in how it looked but still not nearly as wearable as I'd hoped. I think this is a doable as an everyday look if one restricts it to just an accent nail on the ring finger, which is our least used and weakest finger.. It truly was annoying because it was on ALL my fingers.
I want to note here that I did remove it and I did NOT use acetone or any nail polish remover to remove this. I used my Gelish remover to get the beads off my fingers. I simply soaked a cotton ball with Gelish remover, laid it on my nail and wrapped the whole finger in foil. I let it soak for a full five minutes and the beads and most of the polish simply wiped off. It's also great for removing glitters the same way. I often use my Gelish remover to remove old acrylic enhancements for clients as well the Gelish polish it's designed to remove. I chose to use this product instead of Acetone because it's not nearly as rough on my nails and cuticles as Acetone is. The product is too expensive to be used simply as a polish remover - but it certainly save time and work when removing more difficult things like a nail full of microbeads that are swimming in that much topcoat or glitters and jelly sandwiches. The remover is available on Sally Beauty Supply's website. Larger sizes are available through independent distributors of Nail .Harmony products.
I hope you enjoyed reading about my experiment today and Thank You for reading! Don't forget you can follow "Fish Egg Friday" on twitter with the hashtag #fisheggfriday.
Sunday, April 22, 2012
Hearts and Brides
Good Morning! I hope your Sunday is going well, I apologize for the lateness of my post but I'm a bit sick. With that in mind, I'm going to really short today. Enjoy!


Here I stamped the hearts in red, then stamped over them again in white to give the design the illusion of depth.

That's all I have for today, I hope you enjoyed. Have a great day and thank you for reading!
Saturday, April 21, 2012
Flowering Bride
Good Morning and Happy Saturday!! I hope your weekend is off to a good start! I'm continuing my bridal theme today and today's mani I'm going to show you a design in different mediums. Straight nail polish, using Gelish UV Soak off Gel Polish, and finally in acrylic. Let's get right to the nail art, shall we?


These are dried flowers that I purchased from Born Pretty, one of my favorite online sources for nail art materials. Although, I understand that I may soon have a more local to me source and I'm all for supporting budding businesses in my state. I normally like to do this with a rhinestone center but I'm currently out of the correct size and I thought I'd see how it looked using micro-beads as a center. I'm pleased with the outcome. We can't have the fingernail bling outshining the bling on the finger at a wedding now, can we?

Here is the exact same design using Gelish. Because the tips I had prepped were clear, I went ahead and added a base layer of pink to make the nails opaque. I used structure gel to "embed" the microbead centers and keep them firmly secure to the nail.

Here, we again have the flowers with micro-bead centers but now they are completely embedded in acrylic. I layered a glitter gelish polish and the gelish topcoat over the acrylic to give the design the same glittery look as the other mediums. Although, I could have also done this by mixing super fine glitter in with my acrylic powder. Finding loose, super fine, holo glitter is a bit of a challenge.
I hope you enjoyed today's Bridal Looks and it gave you something to consider, not just for your wedding but for those other special occasions. Some art can be done in other mediums, especially with fun things like nail foils, etc. Thank for reading and I'll see you tomorrow!!
Wednesday, April 18, 2012
Spring Cherry Blossoms
Good Morning and Happy Hump Day! I'm so very much into the spring vibe this week, even though we don't actually have "spring" this far south in Florida. We have two seasons, hot and wet; hotter and wetter. Spring and Fall are just hotter and wet. All that being said, I still like the idea of spring - it just makes my creative juices flow!
Today I did some Cherry Blossoms. I've never done these before but it is simple and straightforward and the effect is just sooo pretty. I started out using Orly's "Snow Cone" from the Sweet Collection, and I think this one may be discontinued but it's such a pretty light blue.


Today I did some Cherry Blossoms. I've never done these before but it is simple and straightforward and the effect is just sooo pretty. I started out using Orly's "Snow Cone" from the Sweet Collection, and I think this one may be discontinued but it's such a pretty light blue.

I added the flowers and the branches using acrylic paint.

That's about it for today's nail art. I hope you enjoyed it because I know I certainly enjoyed doing it. It's all cheery without being loud!
Wednesday, April 11, 2012
Funky Retro NOTD
Good Morning and Happy Hump Day! Today's NOTD is definitely retro and funky. I am in a springtime mood but that seems to be expressing itself in contrasting colors with retro and funky stamping designs! I've decided to not fight that at all and just go with it and see where it takes me. Now, onto the pictures!


Sadly, no amount of adjustment using software is ever going to really show that awesome light pink. It's a bubblegum pink with a gold shimmer. It's Milani's "Sunkissed glow". I often call it my "barbie pink" lol

I did a few more of these designs yesterday, so look for them this week. I chose this color combo for my Mani of the week that I'll be walking around with for the next few days and I'll be showing off that design later in the week too!
Enjoy and have a groovy hump day!!
Monday, April 9, 2012
Sock Monkeys!!
Good Morning and Happy Monday!! Today's NOTD nail art design is Sock Monkeys.

Now most of us older people and a few younger people remember these toys. I saw this done on the internet somewhere and I just KNEW I had to do it!! Because who doesn't love sock monkeys????

I wore these for a week until I had seriously worn the tips off, you can see some of that in the pictures because I foolishly didn't photograph them right after I did it. But I LOVED wearing this and I will likely do that again. I know being a teacher all last week that the kids loved it too because I incorporated my monkey nails into songs about monkeys.
I hope you enjoyed today's nails and I'll be back with another nail design that I'll be wearing this week. I am absolutely in the mood to be rocking some spring themes!!
Sunday, April 8, 2012
Easter Designs
Good Morning and a Happy Easter to those that celebrate it!
I have two designs for you today! One was inspired by one of the other mom's at my daughter's school and the other is a culmination of all the things I've done this week. First I'm going to start with the one inspired by Kelly. She's a deeply religious christian gal and a real sweetheart. Her family celebrates the Easter season as a religious holiday only. That is what really inspired me to do this mani.


I have two designs for you today! One was inspired by one of the other mom's at my daughter's school and the other is a culmination of all the things I've done this week. First I'm going to start with the one inspired by Kelly. She's a deeply religious christian gal and a real sweetheart. Her family celebrates the Easter season as a religious holiday only. That is what really inspired me to do this mani.

That one is for you Kelly!!
My second one is the one I did for myself to wear today and tomorrow at the school Easter Egg Hunt. I decided to do a little of everything with this one. I loved the color polishes I chose for the Kelly inspired design so I went ahead and did that again for this one too.

My pre-schooler really likes this one and I did it more for her than for me. I hope you enjoyed today's designs and enjoy the holiday (for either religion) or if that's not your thing - you just have a great day!!
Saturday, April 7, 2012
10 Little Bunnies in a Row
Happy Saturday everyone! I hope your Holiday Weekend is off to a wonderful start! Tonight is the big night when many parents and children will be gathering around the table to color eggs to hide tomorrow! I know that's what we're doing tonight. This will be the first year that my youngest child will get to color eggs. Because of the huge age difference between her and her next oldest sister, it has been a few years since I've done this. I'm very excited and looking forward to this family activity!
In honor of the Big Hunt to begin tomorrow, I have Easter Bunnies for you!! I don't have very many pastel colors in my collection and where I was lacking, I mixed up some acrylic paint to fill in the voids!


I hope you enjoyed my little bunnies today and tomorrow's nail art will try to include everything that makes Easter special to those that celebrate it.
In honor of the Big Hunt to begin tomorrow, I have Easter Bunnies for you!! I don't have very many pastel colors in my collection and where I was lacking, I mixed up some acrylic paint to fill in the voids!


I easily could have taken 10 pictures of these cuties, but I think I will stop at just posting these two. The other two I have are pretty much identical to these two.
Friday, April 6, 2012
Easter Chicks
Happy Good Friday everyone! All Friday's are good though, aren't they? I guess today is just an extra Good day then!
Today's Nail Art is another simple but adorably cute one. It really does make me go "Squeeeeeeeeeeee". Not just because they are cute on their own, but I love lil chicks and we do have chickens that we let run free across our property and every so often we don't take the eggs and let a chicken roost on them to get cute little chicks! Now on with the cutness!


Today's Nail Art is another simple but adorably cute one. It really does make me go "Squeeeeeeeeeeee". Not just because they are cute on their own, but I love lil chicks and we do have chickens that we let run free across our property and every so often we don't take the eggs and let a chicken roost on them to get cute little chicks! Now on with the cutness!

This is one of those nail arts where you can see how the length of the nail really changes how the design looks. I did it the same technique across all the nails but I especially love this on the short pointer finger. The design is clearly ideal for shorter nails!! You don't see that very often either!

I hope you enjoyed my cute little chicks and if you have short nails, you now have some hope for wearing some fun nail art!
Thursday, April 5, 2012
Pop Goes the Chickie
Good Morning and Happy Friday Eve! I've just about exhausted my ideas for Easter Patterned nail art and now I'm moving onto other things within that Easter Theme. Today's nail of the day is Easter Eggs with a hatching chick as an accent nail. I'm going to just get right to the pictures today and let them speak for themselves!


I have no name for the purple, it was part of a "Sally's girl" neon collection but I felt this one should have a bright color rather than a pastel color. The yellow for the chick is Sally Hansen Xtreme Wear, , and the rest of the chick I did in acrylic paint as well as the designs for the "eggs"

That's all for today's nail art. I spent quite a bit of time getting this chick right. I am not telling how many times I had to re-do that nail. I was determined to get it right, even going so far as to looking up tutorials about doing chick nails. I am glad I stuck it out, I'm more than happy with how it finally came out. Always seems to be worth the effort to do and re-do as many times as I need until I'm finally happy with it.
Will you be coloring eggs this year?
Wednesday, April 4, 2012
Eggs-cellent Pattern for Easter
Good Morning and Happy Hump Day!! I hope your Wednesday is off to a groovy start. Today I'll be spending my morning teaching at my daughter's cooperative pre-school and we'll be making Easter Baskets for our Easter Egg Hunt next Monday! With that in mind, today's Easter themed pattern is going to be eggs!!


Please forgive the visable dryness of my skin in these photos. I spilled some acetone on my hands while refilling my remover pump and it took several days of soaking my hand in hot oil lotion overnight to get my skin re-hydrated!

That's all for today and the end of the series of patterns. I'll be continuing the Easter theme but taking it in a different direction!
Tuesday, April 3, 2012
One Little, Two Little, Three Little Bunnies
Happy Tuesday! I hope your week is off to a great start!!
Today's Nail Art is along the same line's as yesterday's! I used a similar technique and instead of little orange beaks, I did little bunny ears! This is pretty self explanatory so I'll just get to the pictures!!


Today's Nail Art is along the same line's as yesterday's! I used a similar technique and instead of little orange beaks, I did little bunny ears! This is pretty self explanatory so I'll just get to the pictures!!


I did these over a super light pink frosty Gelish but you can use a bolder color to really make the pattern pop. You'll notice that this week my pointer finger is short and although it gives me fits to have my nails so uneven, I did it to demonstrate how each of this week's design look on a short nail and a longer nail in one picture. It's not such a dramatic difference on these patterned ones, but it's much clearer on some of the other nail arts I have in store for you this week.
Have a great day and I hope you enjoyed!
Monday, April 2, 2012
Chickie Chickie
Good Morning and Happy Monday!! Today is the first day of Easter week and I'll be doing an entire Easter themed series of nail art this week. I'm going to start with Easter Patterns. All of these are hand painted and not stamped unless otherwise indicated.
I'm going to start with a lil chickie pattern I saw on YouTube. I thought this was the cutest thing ever!!


I'm going to start with a lil chickie pattern I saw on YouTube. I thought this was the cutest thing ever!!


Not very complicated but I thought this was just too cute to pass up!! Who doesn't love a buncha baby chickens?
Sunday, April 1, 2012
Groovy Man
Happy Sunday! I hope you have plans to take a day of rest after a long week! Today I have a super groovy nail art for you. I got the urge to play with some neon "sally girl" colors and decided to make a gradient and stamp over it! Time for some groovilicious pictures!
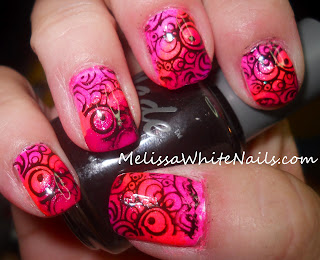


I had entirely too much fun doing this one. It's a little silly and a bit retro. It reminds me of more than a few album covers from back in the late 60's and early 70's. Who else remembers those days? Are you a "retro" person?
Saturday, March 31, 2012
Fly Butterflies Fly
Happy Saturday to you! This morning's nail art is inspired by a few different things. The first one is the gazillion of butterflies we have everywhere happily flitting around a bunch of flowering weeds we have here and there. It adds to the ambiance, love to sit in my yard and just read a book in the sunshine! Add that to the many butterfly tutorial on YouTube and pinterest - there's no way I can NOT do at least one.


I think I went a little too over the top with the dots, but I can always do less dots going forward.

That's going to be it for today - I hope your weekend is off to a great start!!
Monday, March 26, 2012
I'm feeling Tigerish..How About You?
Happy Monday everyone!! This morning's nail art manicure is one I'm genuinely excited about!! I was inspired by an comment on my personal facebook page about yesterday's blog post. I am so happy with how this came out that I got a little more creative with my pictures than I usually do!!


I'm holding a hand carved gazelle Tommy's parents got in Africa. I thought it fitting for the theme.

There I'm holding a carved Lion. I cropped the head out of the picture since it's not actually a Tiger and to maintain some halfway decent proportions to the photo.
This one was relatively simple to do. I have the perfect golden/orange nail polish by Milani, Metallic Mango. Using a make-up sponge, I sponged on Milani's Golden Goddess at a diagonal. Finally, using another make-up sponge, added white to the corner of each nail. Using one of my newly purchased stamping plates I stamped on the stripes in black. A nice top coat of Seche Vite and *POOF* I have Tiger Nails!
I hope you enjoyed and if you gave this a try - post the link to it in the comments!! (Links to anything other than Tiger Nails will be deleted so be good!)
Sunday, March 25, 2012
Dissatisfaction
Good Morning! I know my blog post is late but I was just too tired last night to write it and severely lacking in the inspiration. I had done my latest Gelish in this lovely green. It's an amazing sparkly green and I love the color. You might have noticed that my last few posts have not featured my hands, a large part of that is because many of the nail arts I wanted to do just don't go with this color and one of the designs I apparently am unable to do on my own nails.
All that being said, I still tried to do a nail art with this color and I'm just not satisfied with it. All is not lost though!! I finally got my order from born pretty store.


All that being said, I still tried to do a nail art with this color and I'm just not satisfied with it. All is not lost though!! I finally got my order from born pretty store.

As you can see from the picture, that's a whole lot of stamping plates but it also is dried flowers (clear round containers) and resin rhinestones (in the little baggie). With much encouragement from my significant other, I ran to my studio to check them out.
Again, the color became an issue but I think I did ok moving past it.

Going forward, I'll have to keep in mind that this color really is only for wearing by itself. In the meantime, I'm taking it off a week early and I think I'll go with a clear for now and start wearing some of my bolder nail arts on both hands!
Saturday, March 24, 2012
Wild Saturday Night Mani!
Good Morning everyone!! As you all know, my latest obsession is tutorials on YouTube, and I decided to give these animal print ones a try. I've already done several versions of the cheetah print - so this time I actually did it in the "natural" colors.


From left to right: a full Cheetah Print, a zebra print "french", a "cow" print french, a giraffe print french and finally a tiger print french. A few more pictures because I just love these.

I had made previous attempts at these nails but I just couldn't seem to the get the hang of doing it on my own hand. I guess some nail arts I'll never be able to do on myself. For these I used polish except for the giraffe and the actual print. I didn't have a polish color that even came close to the ones I needed to do the giraffe, so I used acrylic to do the french part too.

Thanks for checking out my blog post today! I hope you enjoyed. I also spent last night working on my own nails for Tommy's Grandfather's 91st birthday! I have no idea if I'll post them right away or not. It really depends on how I feel when I get home tonight, and do I feel like working on this or not.
Subscribe to:
Posts (Atom)