Pages

Showing posts with label pink. Show all posts

Friday, October 5, 2012

The Seasons Turn Turn Turn

So Fall has officially arrived! Living in the part of Florida that I do means there is no change in the weather. We do have many other exciting things going on! After spending what seemed like forever visiting a infinite number of pre-schools, I was finally able to enroll my youngest into one that both of us love! At 14, it's no big deal if your child doesn't love her school, but at 4, it's a bit more important that she feel comfortable! Maybe I'm just a fussy Mommy because she's my youngest, but I'm OK with that! I have mentioned before that I live on an Avocado Tree Grove. It's that time of year again! PICKING SEASON! My weekends are now filled with picking one of my favorite fruits and an endless supply of that yummy and fabulous beauty essential. I'm still contemplating trying a few nail/skin beauty treatment recipes this year!

Speaking of nails, after a month of insanity, things have finally settled into the new routines, and we're all recovered from our first round of "back to school flu". Those of you who also follow me on twitter know that  my nails went naked for almost two weeks. That's the longest period of time my nails have been naked since 2009.  I was sick most of that time, so my poor naked nail were not subjected to much abuse.

I had recently decided to start offering Gelish enhancements and had purchased all the supplies for that already. So today's nails are not just nail art - but my first attempt at a Gelish enhancement over white tips. I have noticed on the blogs, twitter and pinterest are full of fall and Halloween mani's. I do have future plans to join in on those soon! I already have some pictures of some I did last spring based on a random polish color inspiration. October is also Breast Cancer Awareness Month, so I felt it was appropriate to begin this month with Nail Art inspired by that. Cancer is a cause near and dear to my heart as both my parents and my baby sister are all Cancer Survivors! This coming week, I will be looking into ways I can turn my nail art talents to raise money and spread the awareness!

Well, I've rambled on long enough and now it's time for the fun pictures!


Recently, I was able to take delivery of the Speciallita Hits no Olimpo Collection! This is the Atena from that collection. The ribbons and centers of the flowers is pink acrylic paint. I really love this look! I alternated  the accent nails on my other hand. I'll be wearing this one for a few days!! 

Wednesday, May 9, 2012

Matte Pink

Good Afternoon and I'm finally back! I've had quite a bit going here at home that I had to take care and now that it's all successfully completed I've been able to do some new nail arts for my blog once again. Ohhh how I've missed it tooo!! I know a few people's blogs do "Pink Wednesdays" and I'm not sure what the backstory on that is but since I'm returning after a few days off - what better theme to go with?

I've previously matted some super sparkly polishes and done a stamped pattern that was also matted and I really enjoy the look. Here's another look at that theme.


This foil shows up much stronger in bright light and in low light than the picture here really shows. I got a few compliments on this going to pick up my daughter from school (I had only done four fingers and even that was pretty stand out). I'm seriously considering doing the other six fingers and wearing this for a few days because I really just like it a lot.


Just because I had one more shot of it. I think everyone should have at least one bottle of ManGlaze polish. They do have other colors besides just matte topcoat and all are just stunning. I'm not super big on pimping out specific polishes - but I love love love these sooo much! They are a great little company who put out a great line of products!

That's all I have for you today, Thanks for stopping by after my extended break and I'll see you tomorrow!!


Wednesday, April 25, 2012

Bridesmaids need polish too!

Good Morning and Happy Hump Day! I know this is a bridal series, but bridesmaids need polish too!! Today's nail art could work for a bride that has more bold tastes but it's really aimed at the bridesmaids. I decided to get a little wild with the watermarbling yesterday and I did this one too.


I used just Essie's "Swing Velvet" and OPI's "Fit for a Queenslander" from the Australian Collection in this watermarble. I then stamped using a silver foil a rose pattern. Because it's a silver foil, the stamped design is subtle and not immediately obvious. It does give it that something extra that I felt the plain watermarble was missing. 


Of course, this design is also good for Prom - which is fast approaching as well! I'm sure all us old folks remember prom, and some of the scary dresses we chose to wear. Now it's the younger girls turn to wear a dress they will be horrified by later in life. At least we can send 'em off wearing some timeless nails!

That's all for today. Tomorrow will be the last day of this week's bridal series and I'll be  finishing it off with another bold bridesmaid or prom look. Thanks for reading!!


Monday, April 23, 2012

Delicate Bridal

Good Morning and Happy Monday! I'm off teaching preschool today, I was supposed to have the day off but I volunteered to cover for one of the other mom's who sprained her wrist. Poor girl has this HUGE splint on it and she really can't do anything with it. Besides, I like teaching these kids and there's not that many weeks left in the school year.

On to today's nail art. This is one I did during Valentine's but I find it still very much appropriate for the bridal season.


I decided to do today's pix large because this is such a delicate design, I really want you to see it properly.


The base color is a Gelish color, Taffeta with red and green polish stamped over it.  A little regular nail polish remover and the bride is sporting a low-key but pretty look for the honeymoon! 

That's it for today, tomorrow I will show the mani I have planned for my own wedding this summer. To say it's a bit non-traditional would be an understatement. Thank you for reading and have a Groovy day!

Sunday, April 22, 2012

Hearts and Brides

Good Morning! I hope your Sunday is going well, I apologize for the lateness of my post but I'm a bit sick. With that in mind, I'm going to really short today. Enjoy!


Here I stamped the hearts in red, then stamped over them again in white to give the design the illusion of depth.


That's all I have for today, I hope you enjoyed. Have a great day and thank you for reading!

Saturday, April 21, 2012

Flowering Bride

Good Morning and Happy Saturday!! I hope your weekend is off to a good start!  I'm continuing my bridal theme today and today's mani I'm going to show you a design in different mediums. Straight nail polish, using Gelish UV Soak off Gel Polish, and finally in acrylic. Let's get right to the nail art, shall we?


These are dried flowers that I purchased from Born Pretty, one of my favorite online sources for nail art materials. Although, I understand that I may soon have a more local to me source and I'm all for supporting budding businesses in my state.  I normally like to do this with a rhinestone center but I'm currently out of the correct size and I thought I'd see how it looked using micro-beads as a center. I'm pleased with the outcome. We can't have the fingernail bling outshining the bling on the finger at a wedding now, can we?


Here is the exact same design using Gelish. Because the tips I had prepped were clear, I went ahead and added a base layer of pink to make the nails opaque. I used structure gel to "embed" the microbead centers and keep them firmly secure to the nail.


Here, we again have the flowers with micro-bead centers but now they are completely embedded in acrylic. I layered a glitter gelish polish and the gelish topcoat over the acrylic to give the design the same glittery look as the other mediums. Although, I could have also done this by mixing super fine glitter in with my acrylic powder. Finding loose, super fine, holo glitter is a bit of a challenge.

I hope you enjoyed today's Bridal Looks and it gave you something to consider, not just for your wedding but for those other special occasions. Some art can be done in other mediums, especially with fun things like nail foils, etc. Thank for reading and I'll see you tomorrow!!


Friday, April 20, 2012

Bridal Roe!

Good Morning and Happy Friday!! Well after all the fun I had last week doing "Fish Egg Friday" I decided to do it again today. Also, I am starting a new theme for all my nail art - Bridal! So today, you're getting a little bit of a two-fer!

On to the mani!! I named this one "Bridal Roe" because firstly, it's a bridal mani and secondly because salmon is pink and today's fish eggs are definitely pink!


The base color here is OPI's "Kiss Me On My Tulips" and the beads are actually clear which lets the underlying mani colors show through. I've seen how awesome clear beads are over white (for winter/christmas) but they are even more stunning over color!


Here's a few macro shots of the "fish egg" part.


There is a little trick to getting the beads to lay flat and neat on the nail. The pictures below are the "tool" you need to do it and how to use it. 


I have no idea what the tool is called but I have several that came with nail art kits, like dried flowers, rhinestones and even a few puffy nail stickers. It looks similar to a cuticle pusher but rubber end makes that impractical. They are sooo handy for applying anything other than polish to your nail!


Do this step after you've sprinkled or dipped your nail in beads and tapped off the excess.

I got the inspiration for this one from last week's Fish Egg Friday Rant. French Manicure or Pink and Whites - it just seemed the perfect thing to make my statement! All this week has been a variety of Bridal Runway shows reminding me that Bridal season is here!! Yay! "This coming week, I'll be showing you the "Bridal Manicure" I"ll be sporting at my own wedding this summer! Have a Groovy Fishy Weekend! Thanks for reading!! If you did a fish egg Mani - let me know in the comments where to find it and I'll link to it here!

Other ladies posting for Fish Egg Friday:
NailArtAddict
Salla at Polish 'em
The Lacquerologist
Color is Magic
Thoughts of a Midwestern Girlie Girl
Nail Loopy
The Rock Chick Rambles
I Like To Talk Alot A few days old - but she did more than one rockin fish egg mani!

I'll be updating throughout the day since today's Fish Egg Friday is not an organized event like last week's. You can also share/follow FishEggFriday Mani's on twitter with the hashtag #FishEggFriday


Sunday, April 15, 2012

Matte Ombre French?

Good Morning, I hope you have enjoyed your weekend so far. I certainly have been! I went out with my fav uncle Friday night, attending a great birthday party with my youngest daughter for one of her school friends, and  last but definitely not least, MY CAR IS FIXED! After it sitting in the driveway for months while some major work was being done, it sure did get dusty and dirty!! I spent the evening completely cleaning out the inside and  soon as I can get going, I'm going to be washing the outside!

Now, on to the nails! Quite some time ago, I purchased some Manglaze matte topcoat. I have had matte topcoats in the past, but I love the guys behind this for their sense of humor - so I purchased one of theirs. I have as of yet to use it for anything other than the occasional guy. No color, just the matte polish.

So I was messing around in my studio last night and trying out different pink polishes and seeing how they looked with the matte top coat.


It seems that as long as it's not an outright glitter and the more sparkly a polish is, the hotter it looks with the matte top coat. 


I also tried it with Harvest Moon from the Hunger Games collection...wow. But I'll be showing that off come Halloween. ;) Here's another pictures just cuz I really really like this look.


I hope you guys enjoyed today's random ombre and thanks for reading my blog! 

Thursday, April 12, 2012

Who knew I had this much pink?

Good Morning and Happy Friday Eve! Today's NOTD is actually the manicure nail art that I've been wearing all week! I decided I liked the girly pink with berry pink stamped over it so much that I went for another funky stamping design.


I'm not sure how I feel about it but I've certainly gotten lots of compliments on it.The picture above was taken indoors with bright light. The bottle I'm holding is actually the color I used to stamp with. It looks so dark spread on the nail and in the bottle but stamped, it's much more of a berry pink! This was my mystery Essie color and it's called "Swing Velvet" - Yay 4 Google helping me to ID it.


With lower light and a less obvious view of the bottle.

I hope you enjoyed today's design and tomorrow I'll have something much more vampy and suitable for Friday Night Life! Have a great day and thank you for reading!

Wednesday, April 11, 2012

Funky Retro NOTD

Good Morning and Happy Hump Day! Today's NOTD is definitely retro and funky. I am in a springtime mood but that seems to be expressing itself in contrasting colors with retro and funky stamping designs!  I've decided to not fight that at all and just go with it and see where it takes me.  Now, onto the pictures!


Sadly, no amount of adjustment using software is ever going to really show that awesome light pink. It's a bubblegum pink with a gold shimmer. It's Milani's "Sunkissed glow". I often call it my "barbie pink" lol


I did a few more of these designs yesterday, so look for them this week. I chose this color combo for my Mani of the week that I'll be walking around with for the next few days and I'll be showing off that design later in the week too!

Enjoy and have a groovy hump day!!


Sunday, April 8, 2012

Easter Designs

Good Morning and a Happy Easter to those that celebrate it!

I have two designs for you today! One was inspired by one of the other mom's at my daughter's school and the other is a culmination of all the things I've done this week. First I'm going to start with the one inspired by Kelly. She's a deeply religious christian gal and a real sweetheart. Her family celebrates the Easter season as a religious holiday only. That is what really inspired me to do this mani.


That one is for you Kelly!!

My second one is the one I did for myself to wear today and tomorrow at the school Easter Egg Hunt. I decided to do a little of everything with this one. I loved the color polishes I chose for the Kelly inspired design so I went ahead and did that again for this one too.


My pre-schooler really likes this one and I did it more for her than for me.  I hope you enjoyed today's designs and enjoy the holiday (for either religion) or if that's not your thing - you just have a great day!!

Tuesday, March 27, 2012

Wallpaper Butterflies

Good Morning and a groovy Tuesday to you!  This morning I have another attempt at a nail art I saw on pinterest. I really enjoyed doing this one. I have a fab striping brush that is perfect for doing straight stripes. It doesn't work well for anything but stripes but today that's an awesome brush to have! Now on to the pictures!


One more just because I can.


This was relatively simple to do. I painted the nails white, then using a striping brush, I painted stripes on each nail in different colors. Using a stamping plate, I then stamped on a few butterflies. Can you see which one has an upside down butterfly? I did do that on purpose, really I did. 

You'll notice that I'm back to using lone nails rather than my own. I just couldn't bear to give up my Tiger manicure just yet. Hardly anyone has even seen it, so I'm going to wear it a few more days!! 


Thursday, March 22, 2012

More Experimental Nail Art

Happy Friday Eve to you!!  Today I have some more experimental nail art to show you.  This time I'll be showing you two Gelish nail arts. I usually do just the Gelish as my base color, but these are completely done using Gelish polishes.


You can see the larger pieces of holo glitter in this photo and some of the pink holo shimmer as well. It's super sparkly that's for sure!!


This second one is a super glittery sunset with a beaded palm tree done in black. This is the same glitter I used in the one above but it doesn't quite catch the "holo" like the one above did. I was dying to do something beaded with the gel and here it the first one! 

That's it for today. I'll be back tomorrow to show you some of my first attempts at using acrylic paints with nail polish to make flowers. I twitted some of them yesterday if you care to scroll back through my tweets to get a sneak peek!

Thursday, March 8, 2012

Pink Argyle!

Good Morning and a wonderful Friday Eve to you!! So I had previously joined pinterest, and one of the boards I created was of nail art I like and want to try out! Today's Nail Art is one that just love for it's simplicity and girly factor. I think I could have executed this one better, but I'm definitely not unhappy with the overall result and my execution will get better through repetition but you be the judge. I bring you Pink Argyle!


You will probably see this one again when I get it worked out so it looks much crisper and cleaner. The pink is OPI's "Pedal Faster Suzi" from the Holland Collection Mini Set. I'm not even going to mention how many coats it took to hide my sunset mani undernearth. I just love the overall look of this one. It's definitely the glitter accent and the jewels that give it the girly vibe that I fell in love with.

I may or may not have a post for you Friday, I'm starting a "fix-up" project on my work space and the initial portion of that requires that I move everything out to do what I need to do. So I might get that part completed today and everything back in and be able to do some more nail art, but then again, I may not get to the Nail Art. I will return as soon as humanly possible tho!!

Tuesday, February 28, 2012

A Hint of Monet

Good Morning Everyone! I hope you are all having a wonderful  day.  I've always been a big fan of the Fine Arts, I'm a long time visitor to the Museum of Fine Arts Boston and if I were in the right tax bracket, I would be one of their "Patrons". lol

I was inspired for today's Nail Art by Monet and his landscapes. I used one of my stamping plates (I have no idea who puts it out) but it is a little pebble pattern. I used the same design over and over in different shades to try and get same effect. One of the colors didn't transfer so so nice..but I kept it anyway because it fit in the with the theme. You can see it poking out from behind my smile line.

Now for pix!


I hope you enjoyed my interpretation of Monet! 

Monday, February 27, 2012

Beaded Palm Tree

Happy Monday Blogland!! I've got a fresh pot of coffee on and it's time to get to today's Nail Art.

As I have previously threatened, I found some designs to create with my new microbead set. In fact, I went and bought another set to go with the first...just for the variety of colors. For today's Nail Art I only did the beaded design on one accent nail but this could easily be worn on all five fingers. Most of my pictures here are done in my spare time and these days I just don't have as much of that as I'd like. But who does?

On to the Design!


Here's another shot of it, I am still having a lot of difficulties working out getting that Gelish base color to come out "true" in the photos. 


In case you didn't get to yesterday's post...the base color here is Gelish's "Taffeta". It's one of the two colors that comes in their basic kit, and it's the color I prefer to use on a basic french manicure.

What do you think? Would you even attempt something like this if you had the time?

Tuesday, February 21, 2012

Star Flowers

Good Morning and a groovy day to everyone! I'm just going to get right to the picture this morning!


You'd think I'd be sick to death of the pinks, but I'm strangely not. Just because I can, here's another shot.


The second photo, the gradient background is much more pronounced than in the first one. I like both shots, and I just couldn't bring myself to pick only one.  This was a very easy one to do. I did a pink gradient starting my Gelish "Go Girl" and I then sponged on a generic unlabeled polish (I get them for a buck a piece at the nail supply place - great stuff for doing nail with) in hot pink and again with a deeper toned berry color. I stamped the flower using my unknown Essie color.  Sadly, I have no idea what the name is because the writing on the label has long since worn off I've had this one for so long. I grabbed my dotting tool and added a larger dot for the center of the flowers and dot trails in between the petals. Finally, I took my bottle of generic silver glitter, using my striping brush, I brushed glitter over the dot trails. A coat of Seche Vite and *poof* a Star Flower is born! 

We'll see how it goes tonight and how my fingers are doing and hopefully I'll be back to nail art tomorrow. 

Saturday, February 18, 2012

Pink Cheetahs Running Wild

Today's mani is a little funky. I wanted to practice working on doing a cheetah print free hand. I've poured over tutorials and such and today's post showcases my best efforts on that front.


Although not nearly as perfect as it can be if I keep practicing this one - I've made definite improvements over my previous efforts as you can see when you compare it to the Animal Print I did during the 31 Day Nail Art Challenge. The technique is completely different and in my opinion much better than the one I was using before.  I also think the improvement in the brushes I was using also made a huge difference. I feel like this time I was using the right tools for the job.

I want to put together a simple set of nail arts that I can do quick and easy as part of a "free demo" to market myself and my skills. For sure something to think about.

Enjoy the rest of your day and woohoo! It's Saturday! Yay!

Thursday, February 16, 2012

Longing for Spring

Today's post features flower nail art. I used my stamping plates for the flowers and used a super fine tipped brush to "color in" the leaves a different color. I know that roses don't naturally occure in this particular shade, but I just love how OPI's "OPI Ink" works with stamping plates!


Yes, that is still my Gelish Mani color, "Go Girl" as the base color, and as I already mentioned, the roses are OPI's "OPI Ink". I used Sally Hansen's Xtreme wear "Emerald City" to color in the leaves. The pictures here just doesn't do this one justice, if I get the chance, I'll be doing this one again during a day where I can get pictures in the full sunlight!

Hope you enjoyed - Have a Groovy Day!!

Wednesday, February 15, 2012

Gelish Manicures!

Hello and Good Morning Everyone! Today's post is going to be long and very picture heavy - but I hope you enjoy it and can get a better understanding of the process of UV Soak Gel systems in general and Gelish specifically.

One of the perks of using a soak off system is that you are not required to use a color. You are still free to just use a base coat and then a top coat. In fact, many professionals who do long photoshoots with frequent polish changes often use the soak off gel systems instead of a regular polish basecoat. If you're a person who loves to change your mani often or swatch several polishes at a time - this might be a great option for you! I do this with my own nails since I am my own nail art hand model and have been known to do as many as 10 different nail arts in a day. That much acetone exposure can do some serious damage to your nails (just check out my cuticles in this week's posts and you'll see!) and I find it does a great job protecting my nails as well as making for easy removal!

For today's post, I decided to add a color just to show off the Gelish in it's normal salon application. Gelish also has "Structure Gel" whose purpose is to add strength to weaker nails and prevent breakage which can cause the Gel polish to chip. Far as I know, breakage and incorrect application are the only things that cause gel polishes to chip or lift.


I started out with a clean set of nails, and using a 180 grit file (included in the kit) I roughed the surface of the nail.

I then cleaned the nail using the cleaner and applied the Ph Balancer. Next I applied a thin coat of base gel, being careful to not make this coat too thick, applying a too thick basecoat can lead peeling and lifting. Clean any excess that gets on the skin or cuticle by brushing it off with a brush dipped in 90% alcohol. It is important to make sure that none of the product bakes to your skin since your skin will slough off those cells that are bonded to the product and this will cause the polish to lift off the nail and chip.

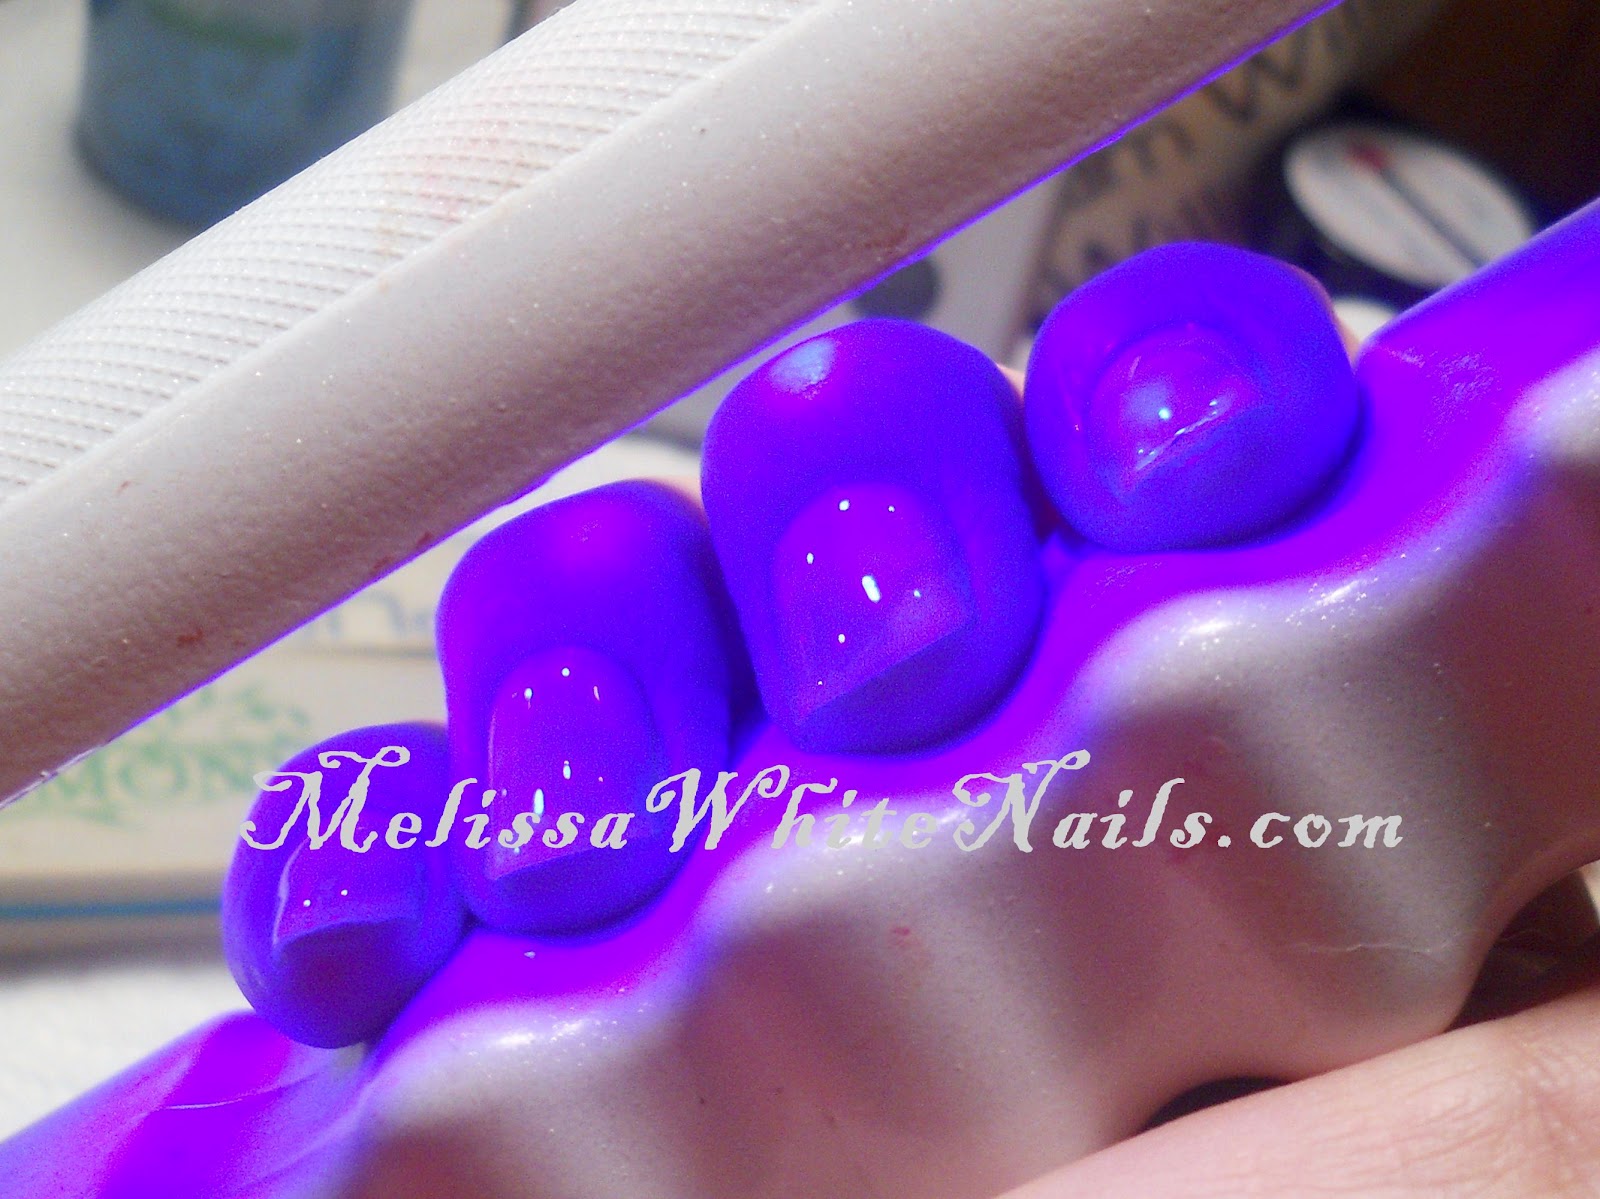
Now it's time to "bake" my basecoat for one minute. I keep a timer handy since over-exposure can be just as bad as under-exposure. The exposure time can vary depending on the type of light used. I use a small portable LED lamp who's exposure times are the same as a regular UV lamp. There are some more expensive LED lamps that can cut the exposure times down to 20 or 30 seconds but those are expensive and usually only worth the cost for professionals since they can easily make that money back by taking more clients with the time saved over the course of a day.


Next I added Structure Gel. This is not a required step! The purpose of this step is to add strength to weak nails to prevent breakage. If you already have strong healthy nails, there is no need for this part.  This step is a little different than the others since it does not come in a polish like bottle with it's own brush. It is applied with a separate  brush (artificial bristles only-picture shows a #14 size). Clean up any excess off the skin and cuticles and bake for two minutes.


Now, it's time to add some color. Again, you can skip this step if you just want a natural look or are using it as a basecoat for regular polishes. I decided to go ahead and use it just to demonstrate how it looks during application and you can add nail art on top of your Gelish mani to spice it up. I have a few clients who love nail art but are not allowed to wear them at work. You'll notice that the first coat of color is slightly streaky and not very opaque - this is normal! Here is my nails with the first coat of Gelish's "Go Girl". Make sure to clean any excess off skin and cuticles.

Bake two minutes (3 minutes if you're using a darker color). Apply a second coat, clean excess off skin and cuticles and repeat. At this point you are free to add additional coats of color and even nail art! The trick with using gel to make nail art is that you often have to do it in steps, baking in between. Since it doesn't dry the same way that regular polish does - you can often create designs by layering contrasting colors and put your design on by using a dotting tool to remove the second color. Here's an example of a gradient design that I did previously.


Now it's time to add our topcoat. Bake the top coat for two minutes and you're done!
Notice how your nails glow in the light. If you intend on using this as a basecoat - I suggest doing a second layer of top coat or do your top coat in a one thick layer.


And now you're done with your Gelish Mani!


The product is guaranteed to last 21 days after a professional application and I have checked out how long it lasts when I'm not brutalizing my nails - well beyond the 21 days. I let it go for four weeks and I had no chipping, fading or yellowing, but the "grow out" was just horrific! I usually have to do mine every other week because my nails do grow very quickly!

I hope you found today's post helpful and I'll see you in your blogs!