Pages

Showing posts with label Flowers. Show all posts

Monday, August 20, 2012

Freshening Up

One of the things I like the most about UV Gel polish is the fact you can wear regular polish over it. Three weeks is a long time to wear the same look. If you're anything like me, you need to change it up a little bit, at the very least from week to week.

One of my favorite ways to freshen up a UV Gel polish mani that feels "old" or boring is to use regular polish for nail art OVER your base color. I did just that to freshen up my wedding mani! Here it is on my wedding day.


Here it after a quick stamp with little glitter dot flower centers added. 


One of the most common things I see in my business is young ladies who cannot wear nail art during the week because of job restrictions. However, they come see me Friday afternoon - and I'll add nail art using regular polish for the weekend which they then remove using regular polish remover before going back to work on Monday morning. 

Freshening up your mani doesn't always have to be done to hide wear and tear! Have some fun with it!! 

Friday, March 23, 2012

Trying new things

Happy Friday everyone!! I hope your weekend is off to a great start! I know mine certainly is. I'm very excited to show you today's nail art! I really had trouble sleeping the other night because I was just that excited about how these came out.

I had been meaning to try my hand incorporating acrylic paint in my nail art and I finally got the paint to give it a shot.  I'm still very much in the spring vibe so I started with flowers!


I'm so very happy with how this ultimately turned out. In my mind, I still need to work on forming the flower petals and leaves, but even with the not quite perfection, I'm totally digging this! I'm also loving it that my camera managed to catch a bit of the holo for the accent bits. It's a very strong non-linear holo and that the picture came out very much how it did in person brings me much joy.


This one is in honor of the opening of "Hunger Games" tonight. I did a gradient using my hunger games polish and white and orange acrylic paints to do the flower. The flower is supposed to represent the flowers that Katniss covers her fellow tribute and ally in during the story. I love this one as well and used a gold holo to accent the orange. The holo is not as strong in person as it is for the one above - but I didn't want to obscure anything by usin such a strong holo. 

I hope you enjoyed today's trials and any feedback you have about these designs would be awesome!! Suggestions are always great too ;) 


Wednesday, March 21, 2012

Experimental Nail Art

Good Morning and Happy Hump Day!! Last night I started working on a side project I have been wanting to try out. I did nail art on some tips  and then using "press on" glue, took the pictures.  The experimental part of this was how to paint loose tips? When practicing, I've always just used nail glue or super glue to glue it to an orange stick. Regular white glue works well too, and the nail pops off clean, which doesn't happen with other types of glue. So, on to the pictures!


Not everything was successful with lil experiment. My more elaborate accent nail got messed up and as you can see there's other minor lil things where beads fell off or the design ran. Next I will try this out using Gelish over those lil cheap press-on nails you buy at the dollar store. The beads are much more secure with the Gelish when in delicate designs and the nails are reuseable if you used "press on" adhesive. 

Have you ever purchased nails with nail art already on them from someplace like etsy? If you do nail art - would you ever consider doing something like this? 

Monday, March 19, 2012

Oh how I love you, Ruby Slippers!

Happy Monday everyone!! Today I'm very excited to show you a new Nail Art using my all-time favorite polish: China Glaze's "Ruby Slippers". On my recent trip to Sally's to score my Hunger Games polishes, I just couldn't resist snatching up the last full sized bottle of "Ruby Slippers". It's for my personal stash and not to be used for clients, and the only polish I own that is just for me.

As many of you know, I am on twitter and I follow many fellow bloggers as well as several companies who produce products I use on myself and clients, recommend for use by my clients at home and many awesome Nail Techs who's skill levels I hope to one day reach. This afternoon, Cutex asked if we could only wear one polish for the rest of our lives, what would it be? Of course, I answered "Ruby Slippers". Duh.

I still had that in mind when I was looking at my list of "must try" board on pinterest. Taking a look at this, I knew exactly which manicure I'd be doing for today!


It's not exactly like the one on pinterest, but I didn't really intend for this to be exactly the same either like yesterday's was.


Even though I knew I'd have to change this less than 24 hours later, I just couldn't bring myself to take this one off right away. I mean, it's got Ruby Slippers in it!! I really do love it that much.


Monday, March 5, 2012

Gelish Grandients gone wild!

Happy Monday!! Continuing on with my ongoing gradient kick...today I bring you Gelish gradients.  I have previously posted my "Fall Colors" gradient as part of my Gelish tutorial, and I'll repost it today but *after* the new one that I'm currently wearing and am in total love with!!


The flower is stamped using regular polish. I was tempted to use the gelish to paint on another palm tree, but I already did that design using all regular polish and it seemed kind of redundant. So, I just finished off with the topcoat sealer and then stamped the flower on......knowing I could change it to anything else depending on my mood. This is really the reason I just LOVE LOVE LOVE Gelish. Because I can change that multiple times a day and it can hold up! I  think I have done a much better job getting the gradient. One of the challenges here is that the gelish half dries, just a film on top, so sponging with it doesn't always create that smooth transition you can get with regular polish. So i will sometimes cure that layer...then take a fresh sponge and very lightly dab to get it properly and then cure again. It really does help that the sponge is not picking up any extra from the nail. You can be the judge by checking out the last Gelish Gradient I did.


I hope you enjoyed today's Nail Arts and if you haven't already considered it, take a serious look at the Gelish products, or any of the UV cured Soak Off Polishes. They truly are a bunch of fun and soooo much more versatile than the manufactures even realize!! This is doubly true since nail art is transitioning from a trend into the Mainstream! 


Wednesday, February 22, 2012

An Experiment Gone Horribly...Right

So, I spent some time yesterday morning checking out some tutorial videos and I came across these gems through nailsmag.com. I check out a variety of their associated blogs quite often, but today I got distracted by the video tutorials. More specifically this one about how to make nail decals using UV Gels. She uses Shellac in the video but across the bottom it said you could try this with any UV Gel system.  Well that got me excited to try it out!!

I managed to make it through my daytime activities until the evening time, which is my "nail work" time. I gave it a shot, and YES! The claim that it works with any UV Gel system is absolutely true! I created my first nail decal. w00t w00t It was my first attempt and I deliberately created a design that was big just so I could see if it worked before I spent a huge amount of time doing tiny detailed work. No, I didn't take a picture.  I did a few that were more "to scale" and they came out okay. There's definitely a size limit on how big you can get with these things so I struggled for a few moments trying to come up with something small enough. I went back to recent art and did a heart...layering a smaller heart in a different color.

It came out fine, great even, but I couldn't imagine what the heck am I going to do with it? It's not like I can't whip out half a dozen hearts freehand in a timely way - thus defeating the purpose of using my own custom decals. My recently purchased Micro-bead set came to mind. You'll see from the pictures below, I created the design on a stiff piece of clear plastic.  In fact, the first one I did on a piece of backing from a set of decals I'd already used but still had the piece of clear plastic. Recycle!

In order to maintain the right scale, I needed to use a pre-made image to work from. I decided to use my stamping plates for that. I just stamped an image on the back of an unused envelope and taped my clear plastic bit onto that. I then grabbed a toothpick, moistened the point and started picking up tiny beads. At this point I'm using a magnifying glass just so I can *see* each individual bead and place it over the design. I got into my groove and finished the design. I brushed a gel top coat onto the beads with a super thin striping brush tip. I wanted to strengthen the bond to the base of the decal but not drown the beads in gel.

These pictures are not anywhere near professional looking - but I am so excited how well this came out that I went ahead and took some even though I haven't figured out the presentation part of it yet.  I just *had* to share!
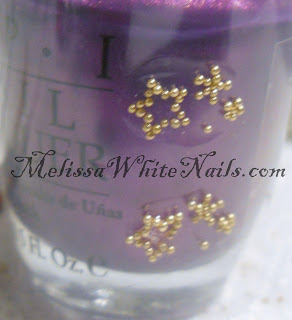
With Backing taped to a bottle of OPI

With a Stamping Plate and a painted piece of paper

I think this is a for sure winner right here.  What do you think? Would you buy something like this to apply yourself?


Tuesday, February 21, 2012

Star Flowers

Good Morning and a groovy day to everyone! I'm just going to get right to the picture this morning!


You'd think I'd be sick to death of the pinks, but I'm strangely not. Just because I can, here's another shot.


The second photo, the gradient background is much more pronounced than in the first one. I like both shots, and I just couldn't bring myself to pick only one.  This was a very easy one to do. I did a pink gradient starting my Gelish "Go Girl" and I then sponged on a generic unlabeled polish (I get them for a buck a piece at the nail supply place - great stuff for doing nail with) in hot pink and again with a deeper toned berry color. I stamped the flower using my unknown Essie color.  Sadly, I have no idea what the name is because the writing on the label has long since worn off I've had this one for so long. I grabbed my dotting tool and added a larger dot for the center of the flowers and dot trails in between the petals. Finally, I took my bottle of generic silver glitter, using my striping brush, I brushed glitter over the dot trails. A coat of Seche Vite and *poof* a Star Flower is born! 

We'll see how it goes tonight and how my fingers are doing and hopefully I'll be back to nail art tomorrow. 

Sunday, February 19, 2012

Froggy Flowers

Good Morning Everyone! Today's nail art is a lil stamped frog chilling in the flowers and the rain.  I hope you enjoy it!


I'm sad to say you really can't see the amazing gradient I did with this one. You can almost see it in this picture, but it looks more like texture and less like the greenish-gold shimmers that it should be. It's definitely a gradient combination I'll do again, but I'll remember to do it during the daytime, so it can be photographed in full sun. Hopefully that will help.

I might have to take a few days off from doing nail art. I was practicing my acrylic work today and got a glob of dried acrylic in my brush. Silly me used my fingers to free glob knowing full well that I am sensitive to acrylic and now my hands are all swollen. Fortunately, I did manage to get a few more nail arts done this evening before the offended fingers got puffy, so I do have two more days worth of pictures to show you. Hopefully, by then, I'll be recovered enough to get some more done. If not, I can always write do a post about something other than nail art. There are other aspects to being a manicurist that I just LOVE.  

Monday, February 13, 2012

14 Days of Love - Day 11: The Lost Post

As I promised, I have my missing post for you!! woohooo!! It's been a little bit of a struggle lately to coordinate parenting time with my significant other so we can both get home projects done or further along. I got to sit down last night and do the nail art for the rest of this holiday nail art celebration and I found the idea flowed freely - not just for this - but for other nail arts as well.


You'll notice I started watermarking the pictures. Although I am not aware of anyone stealing my pictures, I figured why wait until it happens to start? I really should have been doing it from the beginning, but now I've got all my pictures watermarked and switched out on my website. Now I will be going through old posts here and switching those pictures for watermarked ones. It's alot more tedious on here than it was on the rest of my website - but I'll find odd moments to do them as I go.