I've been pretty busy over the month of January! I've been keeping on track with my New Year's resolutions, filling some custom orders for nails, and helping my husband with his palm trees. In fact, Today I worked on the very plants used in the background photo for this blog and my website!
Showing posts with label Gold. Show all posts
Showing posts with label Gold. Show all posts
Monday, February 11, 2013

Wednesday, October 31, 2012
Happy Halloween!
Good Morning Everyone!! Happy Halloween! It's been a lot busy here lately. (when isn't it, right?) I hope all of you that were in the path of Sandy find yourselves safe and sound today!!
Today's nail art is one I did last spring, but haven't posted just because the color combination so obviously screamed Halloween! So, I saved it just for today.
Without further ado, I bring you pictures!


Today's nail art is one I did last spring, but haven't posted just because the color combination so obviously screamed Halloween! So, I saved it just for today.
Without further ado, I bring you pictures!


I used Mattetastrophe to give the orange a matte finish and left the black glossy and trimmed the diagonal with a gold glitter.
I hope your Halloween is filled with more treats than tricks!! What are you dressing up as?? I still have no clue! :O
Thursday, May 10, 2012
Half and Half
Good Morning and Happy Friday Eve! I can't believe it's Thursday already? Where did the week go?? I swear, the older I get the faster the day go by. Today's Nail Art of the Day is a little different. I have a KandNail stamping plate I got from BornPrettyStore and one of the downfalls of these plates is that the designs are great but often too small to completely cover an entire nail.......unless ur like 6. I really wanted to do this design though...but as Tim Gunn likes to say "Make it work!"


This really made me happy because it's just sooo bold! Perfect for a night out wearing your favorite Little Black Dress! I'm definitely going to have to try this with some of the other designs but let's take one more look at it shall we?

Here, I tried to get a half-way side view of this look. I did have to 'stack' the stamped print on my nail but apparently I can do that top/bottom wise but not so much left/ride sides. Thus the half of the nail being painted black. I'm super happy with this outcome and I hope you like it too!
That's all I have for you today, Thanks for reading and have a groovy day!!
Monday, March 26, 2012
I'm feeling Tigerish..How About You?
Happy Monday everyone!! This morning's nail art manicure is one I'm genuinely excited about!! I was inspired by an comment on my personal facebook page about yesterday's blog post. I am so happy with how this came out that I got a little more creative with my pictures than I usually do!!


I'm holding a hand carved gazelle Tommy's parents got in Africa. I thought it fitting for the theme.

There I'm holding a carved Lion. I cropped the head out of the picture since it's not actually a Tiger and to maintain some halfway decent proportions to the photo.
This one was relatively simple to do. I have the perfect golden/orange nail polish by Milani, Metallic Mango. Using a make-up sponge, I sponged on Milani's Golden Goddess at a diagonal. Finally, using another make-up sponge, added white to the corner of each nail. Using one of my newly purchased stamping plates I stamped on the stripes in black. A nice top coat of Seche Vite and *POOF* I have Tiger Nails!
I hope you enjoyed and if you gave this a try - post the link to it in the comments!! (Links to anything other than Tiger Nails will be deleted so be good!)
Saturday, March 17, 2012
Pot of Gold Shamrocks?
Happy St. Patrick's Day!! I hope you are celebrating today and enjoying the fun spirit of this great holiday in whatever way suits you best!! Today's Nail Art was one I had been considering but waited to even think about trying to execute...then I saw a similar idea on Pinterest. The idea was almost identical to what I had been planning to do, including using gold microbeads as my "pot of gold". I had planned on using more microbeads for the rest of the design and well you can see here how that worked out. I really liked this one and Wednesday night after I finished doing all this pictures for this week, I decided that this one HAD to be today's Nail Art!!

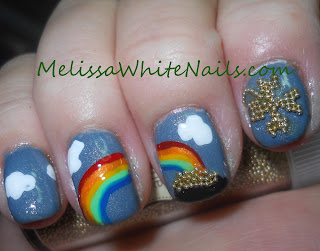


I hope you enjoyed this week's theme and I'll be back to my regular nail arts tomorrow. I hope be recieving a package soon with new stamping plates to bring you some fun new designs and color choices.
Wednesday, February 22, 2012
An Experiment Gone Horribly...Right
So, I spent some time yesterday morning checking out some tutorial videos and I came across these gems through nailsmag.com. I check out a variety of their associated blogs quite often, but today I got distracted by the video tutorials. More specifically this one about how to make nail decals using UV Gels. She uses Shellac in the video but across the bottom it said you could try this with any UV Gel system. Well that got me excited to try it out!!
I managed to make it through my daytime activities until the evening time, which is my "nail work" time. I gave it a shot, and YES! The claim that it works with any UV Gel system is absolutely true! I created my first nail decal. w00t w00t It was my first attempt and I deliberately created a design that was big just so I could see if it worked before I spent a huge amount of time doing tiny detailed work. No, I didn't take a picture. I did a few that were more "to scale" and they came out okay. There's definitely a size limit on how big you can get with these things so I struggled for a few moments trying to come up with something small enough. I went back to recent art and did a heart...layering a smaller heart in a different color.
It came out fine, great even, but I couldn't imagine what the heck am I going to do with it? It's not like I can't whip out half a dozen hearts freehand in a timely way - thus defeating the purpose of using my own custom decals. My recently purchased Micro-bead set came to mind. You'll see from the pictures below, I created the design on a stiff piece of clear plastic. In fact, the first one I did on a piece of backing from a set of decals I'd already used but still had the piece of clear plastic. Recycle!
In order to maintain the right scale, I needed to use a pre-made image to work from. I decided to use my stamping plates for that. I just stamped an image on the back of an unused envelope and taped my clear plastic bit onto that. I then grabbed a toothpick, moistened the point and started picking up tiny beads. At this point I'm using a magnifying glass just so I can *see* each individual bead and place it over the design. I got into my groove and finished the design. I brushed a gel top coat onto the beads with a super thin striping brush tip. I wanted to strengthen the bond to the base of the decal but not drown the beads in gel.
These pictures are not anywhere near professional looking - but I am so excited how well this came out that I went ahead and took some even though I haven't figured out the presentation part of it yet. I just *had* to share!
I think this is a for sure winner right here. What do you think? Would you buy something like this to apply yourself?
I managed to make it through my daytime activities until the evening time, which is my "nail work" time. I gave it a shot, and YES! The claim that it works with any UV Gel system is absolutely true! I created my first nail decal. w00t w00t It was my first attempt and I deliberately created a design that was big just so I could see if it worked before I spent a huge amount of time doing tiny detailed work. No, I didn't take a picture. I did a few that were more "to scale" and they came out okay. There's definitely a size limit on how big you can get with these things so I struggled for a few moments trying to come up with something small enough. I went back to recent art and did a heart...layering a smaller heart in a different color.
It came out fine, great even, but I couldn't imagine what the heck am I going to do with it? It's not like I can't whip out half a dozen hearts freehand in a timely way - thus defeating the purpose of using my own custom decals. My recently purchased Micro-bead set came to mind. You'll see from the pictures below, I created the design on a stiff piece of clear plastic. In fact, the first one I did on a piece of backing from a set of decals I'd already used but still had the piece of clear plastic. Recycle!
In order to maintain the right scale, I needed to use a pre-made image to work from. I decided to use my stamping plates for that. I just stamped an image on the back of an unused envelope and taped my clear plastic bit onto that. I then grabbed a toothpick, moistened the point and started picking up tiny beads. At this point I'm using a magnifying glass just so I can *see* each individual bead and place it over the design. I got into my groove and finished the design. I brushed a gel top coat onto the beads with a super thin striping brush tip. I wanted to strengthen the bond to the base of the decal but not drown the beads in gel.
These pictures are not anywhere near professional looking - but I am so excited how well this came out that I went ahead and took some even though I haven't figured out the presentation part of it yet. I just *had* to share!
 |
| With Backing taped to a bottle of OPI |
 |
| With a Stamping Plate and a painted piece of paper |
I think this is a for sure winner right here. What do you think? Would you buy something like this to apply yourself?
Subscribe to:
Posts (Atom)